October 1st, 2019 by Suyash Dubey
[xyz-ihs snippet=”quickLinks-Appium”]
In our previous chapter on Android, we learned about UI Automator Viewer, Which is available on Android SDK, to get the properties of the application object. In the case of iOS, Appium itself provides an Inspector which helps users to locate those elements in the application.
First, open the simulator by clicking on the dock option.
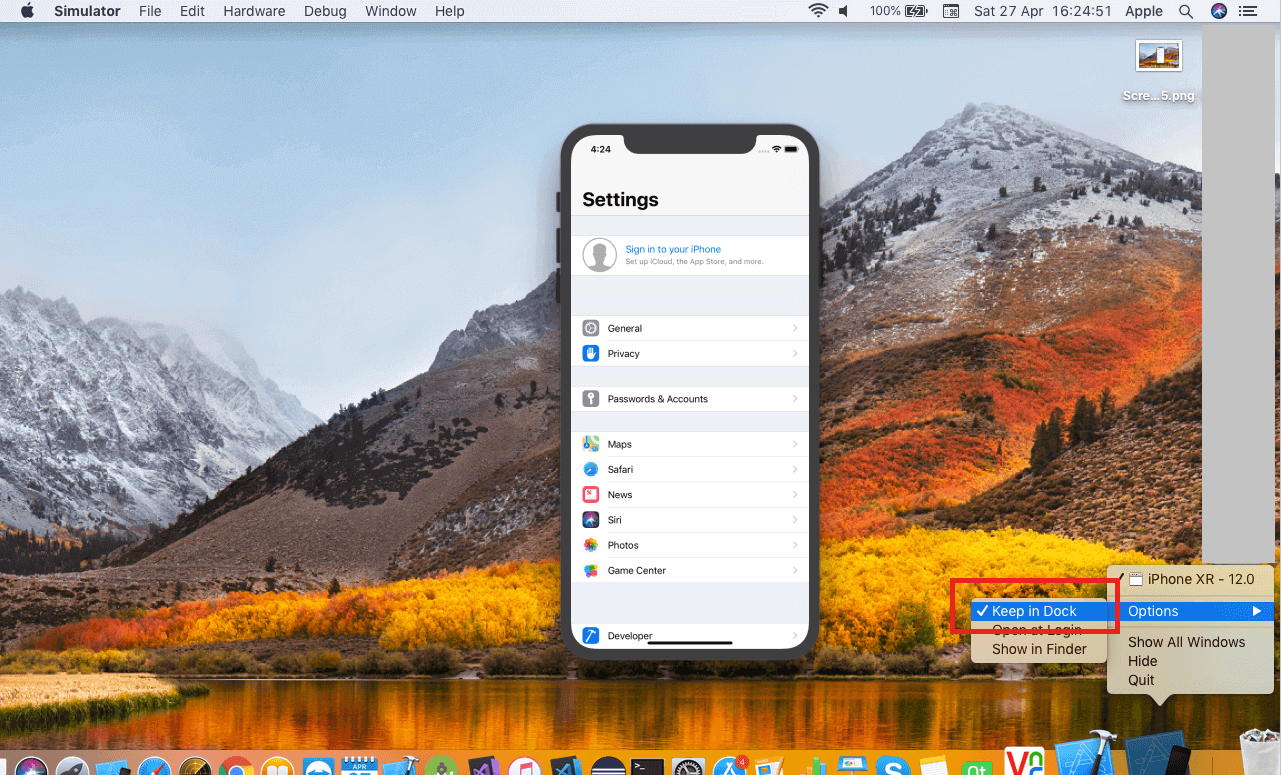
Now in the Device/Simulators window, select the simulator. Open the Appium Desktop and keep the simulator side by side.
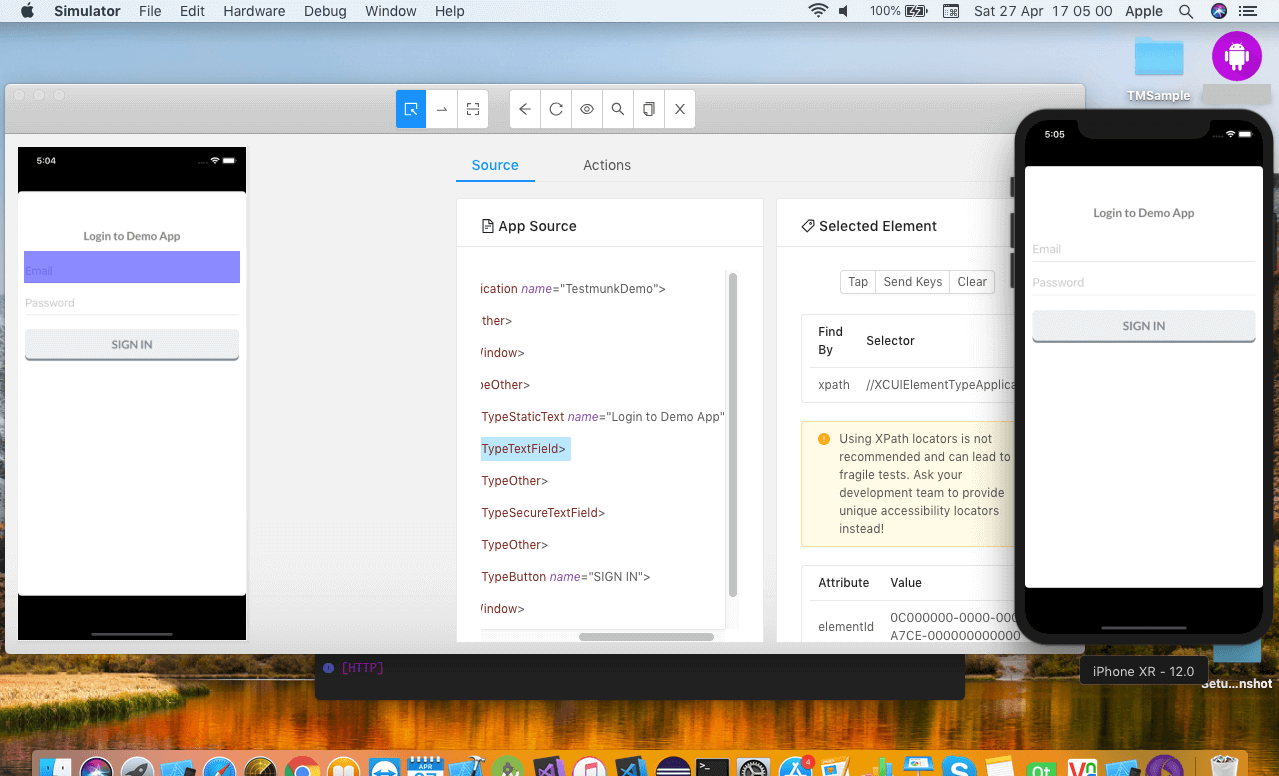
Once the inspector is started, select any of the objects on the screen. It will show you the complete hierarchy and properties of that object.
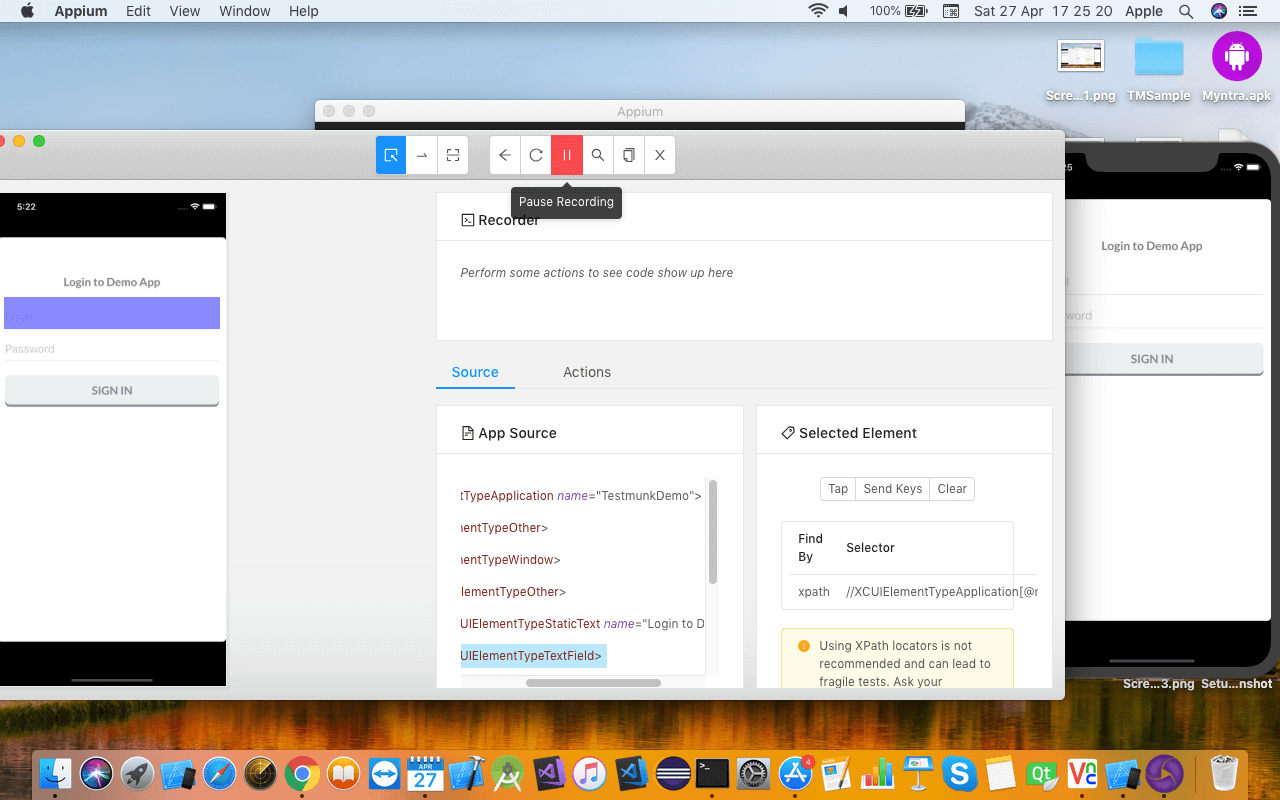
At the top of the window, you can see the Record button which is used to record all the actions taken and record the script.

To select any object, click on the Select Element button and then you can use Tap button to click on an object, Send Keys to enter text and clear to undo the action.
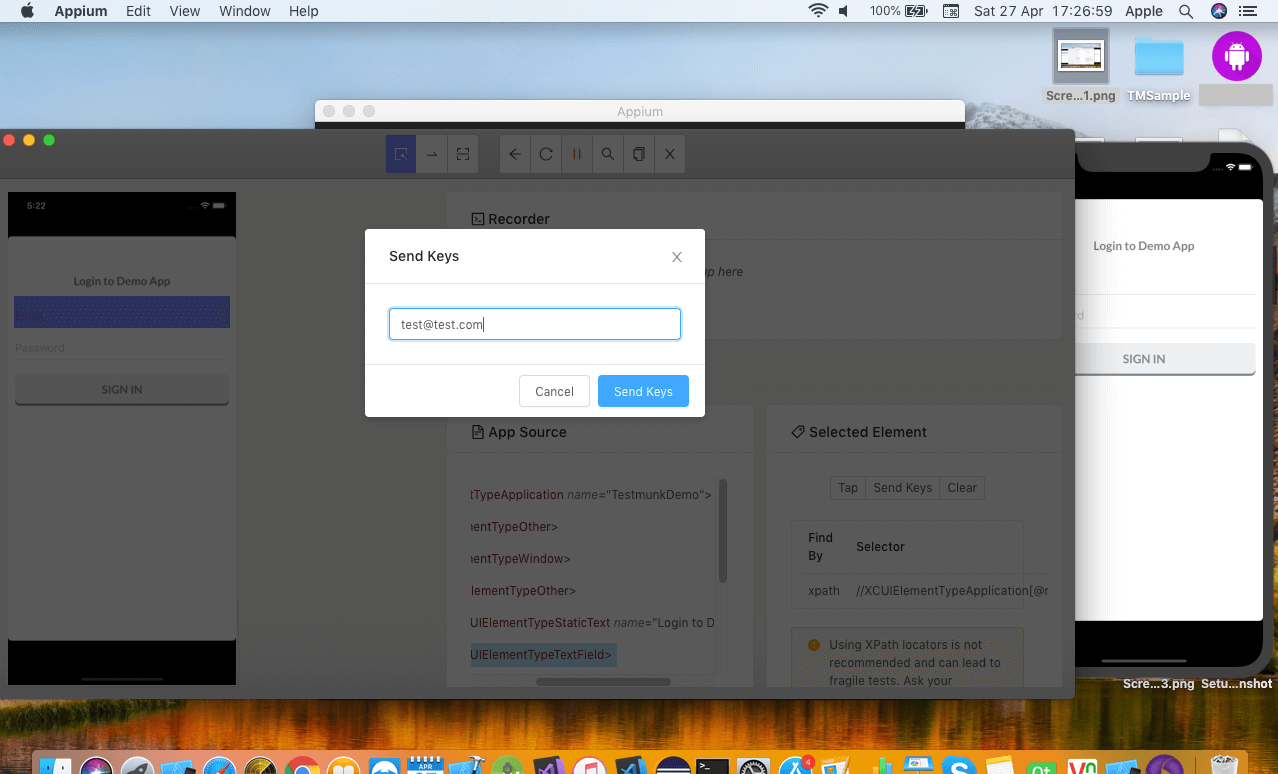
As soon as you perform an action on an object, it is recorded in the form of a script.
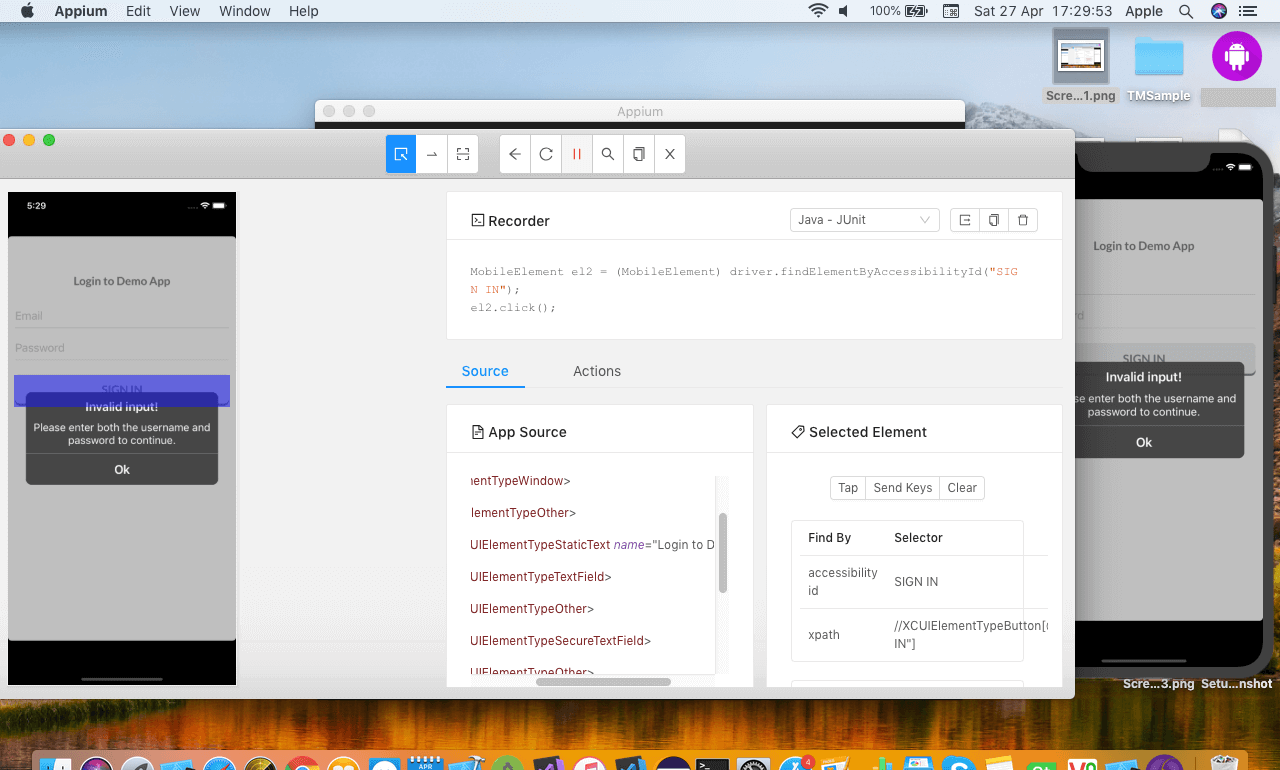
Once you are done with the recording you can copy the script and paste in eclipse editor.
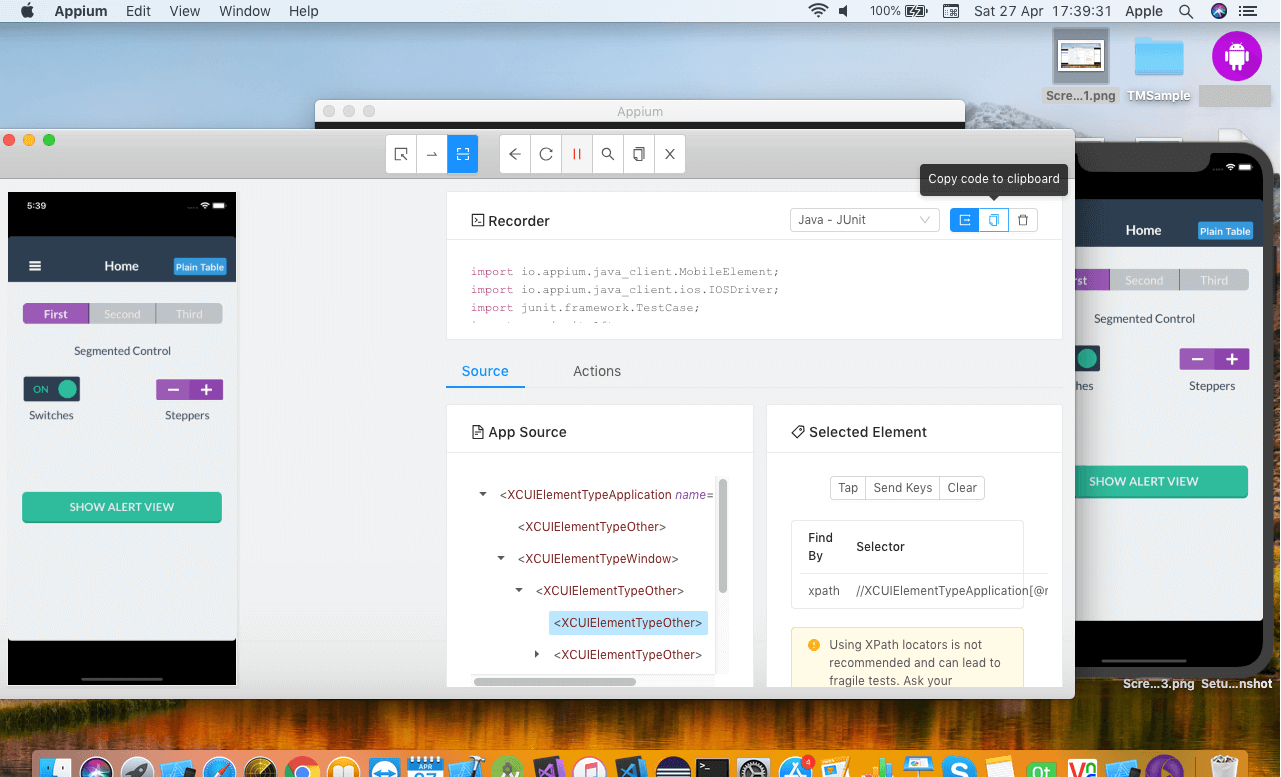
In the next blog, we will learn how to write the first appium script for iOS.
Related Articles:
Appium vs Espresso: The Most Popular Automation Testing Framework in 2019
How To Install Appium On A Mac Machine
Writing The First Appium Test Automation Script (Android)
Basics of Appium Mobile Testing
8 Common Appium Mobile Test Automation Mistakes and How to Avoid Them
September 19th, 2019 by Suyash Dubey
While there is a substantial increment in the mobile apps market share, web apps are still prevalent with a significant user base. Enterprises are focusing on the quality at speed when it comes to web apps, before deployment. This is where testing has an important role to play. UI testing is still mostly a manual process unlike some functional testing which can be automated. But it is sensible to automate testing which will save time and effort. When it comes to automation, Selenium testing is the first thing that comes to mind as it is the most popular test automation tool in the world. So let’s learn more about selenium testing.
What is Selenium Testing
Selenium testing tool is open-source and it enables users to drive interactions with the page and test the app across various platforms. It allows users to control a browser from their preferred language like Java, JavaScript, C#, PHP, Python, etc. Selenium has many tools and APIs for automating user interactions on HTML JavaScript apps on browsers like IE, Chrome, Firefox, Safari, Opera, etc.

Selenium Framework is a code structure that helps to simplify and reuse the code. Without frameworks, we will place the code as well as data in the same place which is neither re-usable nor readable. Selenium automation frameworks are beneficial for higher portability, increased code re-usage, higher code readability, reduced script maintenance cost, etc.
What is Selenium Web Driver
Selenium WebDriver accepts commands via the client API and sends them to browsers. Selenium WebDriver is a browser-specific driver which helps in accessing and launching the different browsers like Chrome, Firefox, IE, etc. The WebDriver provides an interface to create and run automation scripts and every browser has different drivers to run the tests. The different drivers are IE Driver, Firefox Driver, Safari Driver, Chrome Driver, etc.
Selenium WebDriver was introduced to negate limitations of Selenium RC, which offers enhanced support for web pages where the elements on a page change without reloading. Many browsers support selenium WebDriver and it uses each browser’s native support for automation testing. The features are supported and direct calls are made depending on the browser that is being used.

WebDriver Project depends on the programming language as well as the development environment. Selenium supports multiple languages and projects can be set up using many programming languages. Selenium provides JavaScript bindings on npm. Java projects can be setup using Maven and it will also download Java bindings and dependencies to create the project.
Run pip install selenium from the command line to add selenium in a python environment. C# bindings are there as part of a set of signed dlls and dependency dlls. You can get PHP bindings through third parties, including Chibimagic and Facebook. To add Selenium to your Ruby environment, run gem install selenium web driver from the command line.
Once you set up the environment, the selenium webdriver operates like a normal library. The selenium webdriver can self sustain as there is no need to run any installers or process before using it.
Selenium Grid
Selenium grid is a part of the Selenium Suite that allows the running of multiple test cases across different browsers, operating systems, and machines in parallel. This is called parallel testing.
In simpler words, it runs a test in parallel on multiple machines.
The test cases are triggered by a local machine. When the test cases are triggered they are automatically executed by a remote machine. So one local machine controls the triggering of test cases on multiple remote machines. For this, you need to configure a remote server so that the test cases are executed there.
Hence the architecture of the selenium grid consists of “Hub” and “Server”
Hub in Selenium Grid
Hub in selenium grid is the local machine that controls the triggering of the test cases which are executed in the multiple devices connected in parallel to it. So, the hub accepts the access request from the Webdriver client, routing the JSON test commands to the remote drives.
In short, the hub is the central machine where you will load your test and run it, but the browser will be automated in the node.
Node in Selenium Grid
A node in the selenium grid is a machine in which the browser is automated and the test cases are executed
which are triggered by the Hub. A node consists of the browser, native OS and remote web driver, in fact, all the nodes connected in parallel consists of this configuration.
How does the selenium grid work?
The selenium grid works like a regular web driver except for its two components, the Hub and Nodes (consists of remote Java Servlet which execute the test on a remote device) where the test cases are executed automatically through a remote web driver.
In your test script, you define ‘desired capabilities’ (device, platform, browser, etc.) of the node where the test will execute. The Hub receives this script, runs through the registered nodes to find one that matches the desired capabilities, and assigns the test to it for execution.
So, setting up Grid is not that difficult but scaling, configuring and maintaining its integrity may take lots of effort and resources.
Hence, Selenium Grid is mostly used for Load testing, to calculate and optimize the maximum capacity of an application to sustain the peak user load. We can use it to determine whether the current infrastructure is sufficient to run the application. To measure the number of concurrent users that an application can support and the scalability to allow more number of users to access it.
How does Selenium Boost Agile
Agile is a simple, not much organized but a continuous model that has a modular structure that promises the quality of the product.
The Agile workflow is as follows:
Once the Stakeholders agree on the simplest working design, it gets divided into smaller modules.
The module is then divided into the team of designers, software developers, and the Quality Assurance team.
The team works in a sprint to make their particular module and take a time frame called “iteration”, a window of one to four weeks to complete it. (Scrum meeting are usually carried out to gather and track work updates).
After each iteration, finished modules are put together. Multiple tests are run and the functional product is demonstrated to the stakeholder.
On receiving the product, it is evaluated by the stakeholders, add customer feedback and adapt as required, (they might ask the engineering team to add features in the product whenever required).
Where does the Selenium automation come in:
After every iteration, the finished product goes through a number of testing like System and Integration testing. After receiving the functional product the stakeholders carry out the unit and user acceptance test.
If there is any change or any feature is added then gain a series of functional test including regression testing is executed
In this way, Selenium testing is very suitable and boost Agile Methodology.
What types of testing can be automated by Selenium:
1.Compatibility Testing
Compatibility Testing is done by the QA team to assure that the web app meets the desired requirements on the browser-OS combination. Testing on various devices of different screen sizes is required to measure the responsiveness of the app. We need to test if the app is able to function properly in different types of browsers, also, for instance, to check whether the video adds are executed properly and runs on every browser and screen size. Here selenium automation will reduce the time and effort to execute the test cases.
2. Performance Testing
After the finished or functional product is handed over to the stakeholders they may run a series of performance testing to measure various parameters like loading speed, the navigation speed in case of web apps, responsiveness and stability of the product. In this case, an open-source tool like selenium which is easy to install and execute can be used to get accurate and efficient results.
3. Integration Testing
Integration testing is usually done while integrating all the modules coded separately also functions properly when assembled together. It is usually done when a new feature is added to the system. This requires a suite of lengthy test cases that requires automation to fetch efficient results. Selenium testing can make the process very easy.
4. Regression testing
A series of test cases are required to check if the new build feature is working in accordance with the existing feature. Also, you need to check if there is any adverse effect on the app due to the newly added feature. This is called regression testing. For example, if you want to add a call to action button in your blog page, you need to make sure that the button is working fine and also there is no change in the content of the blog page. Again selenium testing can help you to reduce the effort of using lengthy and test cases while giving accurate results.
Writing a Script for Selenium Automation
Let’s see how to launch a browser from the script. Make sure you have downloaded the selenium jar files and the third-party drivers. To launch a browser, the first thing you need to do is to create an object for web driver. Then use a get method to launch a new browser session and direct it to the URL specified in the parameters.
Now you need the system pointing to the location of the downloaded exe file of your browser. You can do that by using System.setProperty. Then provide the browser driver in the key and the path to the location of the browser exe file in the value. Here System is a build-in class and setProperty is a method to access the browser driver.
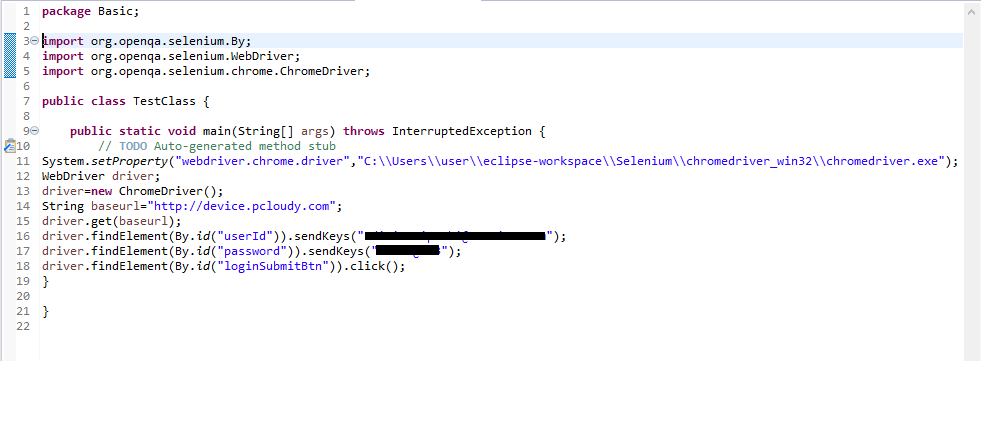
Once the path is set, you need to create an object for the WebDriver class. Hover the mouse on the highlighted value and then import it from the list as we have already added the jar files in the project.
There are two more methods, driver.close() which can be used to close the active browser window and driver.quit() is used to close the browser as well as all the associated windows.
To get the ID of any element in a web page like a button, image, logo, textbox etc., Just right-click and select inspect. You will get the source code from where you can copy the ID to be used in the script. You can also use any other element locator for the script.
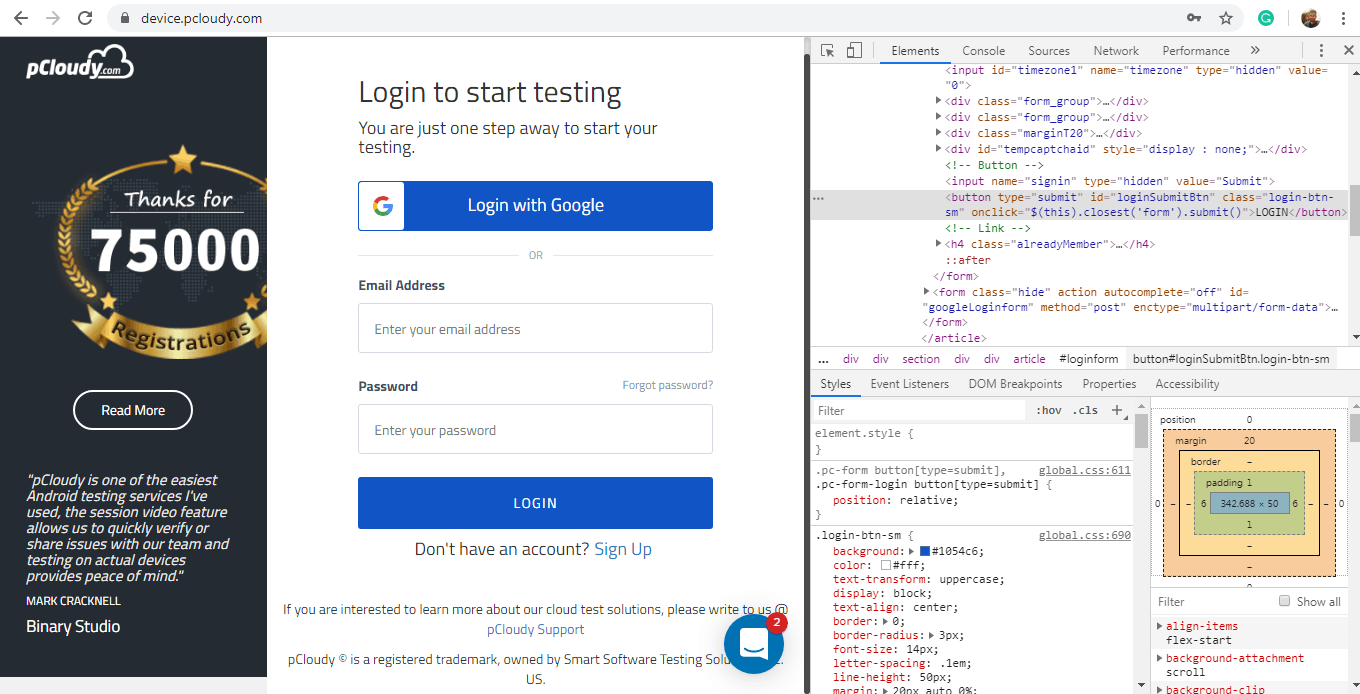
Now mention the driver instance and select the findElement method from the WebDriver class. Then select the ID locator and mentions the value which we copied from the source code. Use sendKeys to pass some value to a particular web element.
How to use Selenium IDE for Test Automation
Running test cases in Selenium IDE is easy. It is a Firefox plug-in which helps in recording the test and convert into code. There are multiple options for running a test case including a “Run” button to run the displayed test case.
The “Run All” button is used to run the test cases in the test suite that are currently loaded. The “Pause” button allows pausing and restarting of a running test case. There is a “Speed” button to maintain the speed of the test case runs. With the “Record” button you can record the actions taken in the web browser.
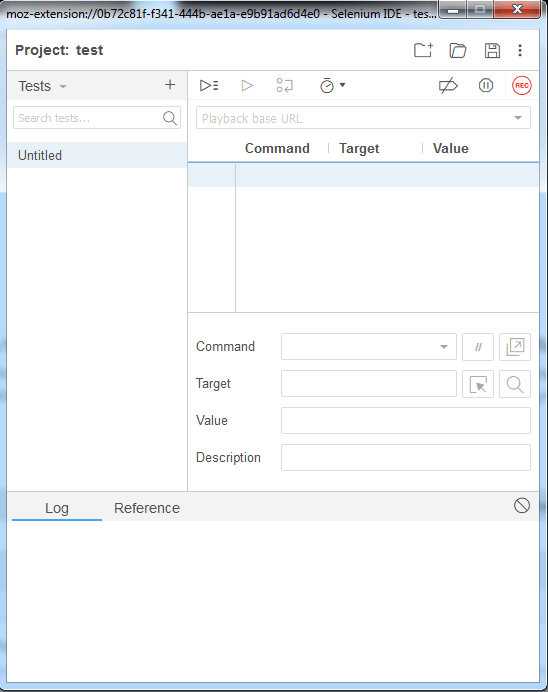
You can also use a base URL in selenium IDE to run test cases in multiple domains by mentioning a relative URL as the argument to open the test case.
The table displays the command and their parameters in a readable format. Whereas the command target and value fields display the currently selected command along with its parameters. The log will show you any kind of error messages and information messages and in the reference, you will find the documentation of the selenium command currently used.
You can use a simple HTML file and define your list of tests to define a test suite. Each row in the file should define the path to the tests you want to add in the suite. You’ll find many ways to put these tools to use to improve the development and testing processes.
To Sum Up
Enterprises are always looking to optimize the testing process and automation is one way to do it. Although it is important to use an effective tool for automation and Selenium automation testing is the best choice as it is open source and easy to use. Apart from Selenium testing, you can also opt for advanced tools like pCloudy, which has better features to make automation testing smooth as butter.
Want to test your Mobile App?
Join pCloudy Platform!
Related Articles:
Selenium for Mobile App Testing
17 Best Tips To Write Effective Test Cases
5 Ways AI is Changing Test Automation
8 Common Appium Mobile Test Automation Mistakes and How to Avoid Them
Cross Platform Mobile Test Automation Using Appium
July 10th, 2019 by Suyash Dubey
[xyz-ihs snippet=”quickLinks-Appium”]
Appium is an open source mobile app UI testing framework. You can test all types of mobile apps and perform automation test on physical devices as well as on emulators and simulators. Appium mobile testing does not have a dependency on mobile device OS and it supports cross-platform app testing as a single API works for both Android and iOS. Appium supports many popular languages like C, PHP, Python, C#, Java, Ruby, JavaScript, etc.
What is Appium Mobile Testing?
When Appium is installed then a server is set up on your machine that exposes the REST API. It receives a command request from the client and executes that command on Android or iOS mobile devices. Then it responds back with an HTTP response. It uses mobile test automation frameworks like Apple instruments or UIAutomator2 to drive the UI of apps.
Approaches to Test Automation
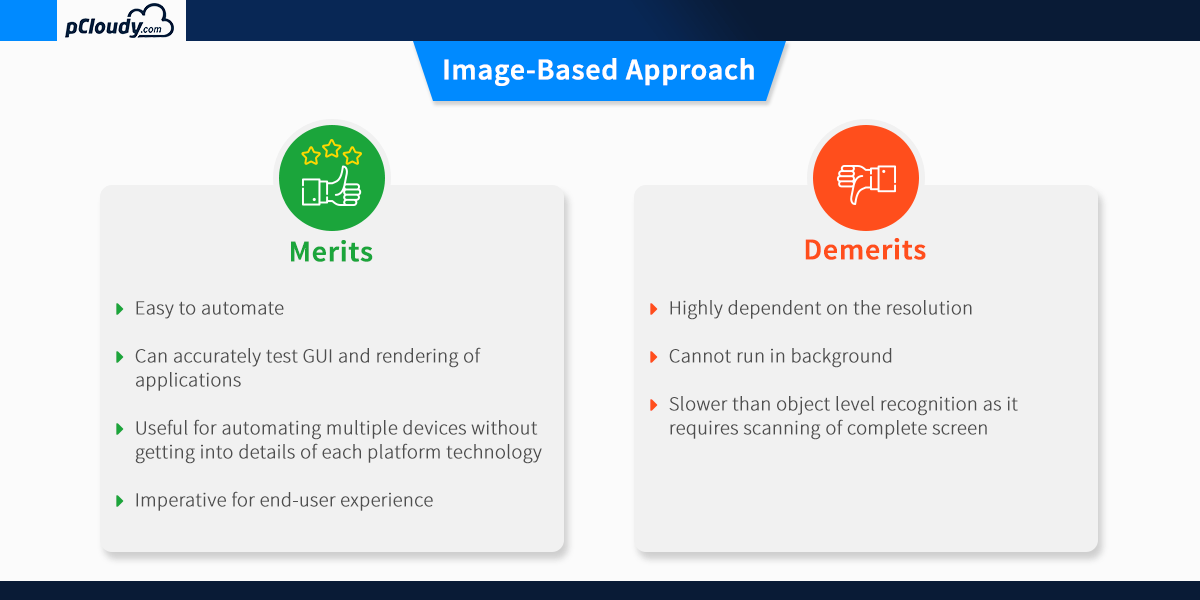
There is two approaches for mobile test automation, Image-based and Object-based approach. Let’s understand both in detail.
Image-Based Approach for Test Automation
This technique of object identification is based on the image processing attributes of the objects in the Application Under Test (AUT). Example: Automate user options like “click, type, drag-drop, mouse actions, etc.”
Visual verification of the expected output
• Not dependent on the platform underneath
• Can be used to automate emulators as well as a real device.
The object-based approach of test automation
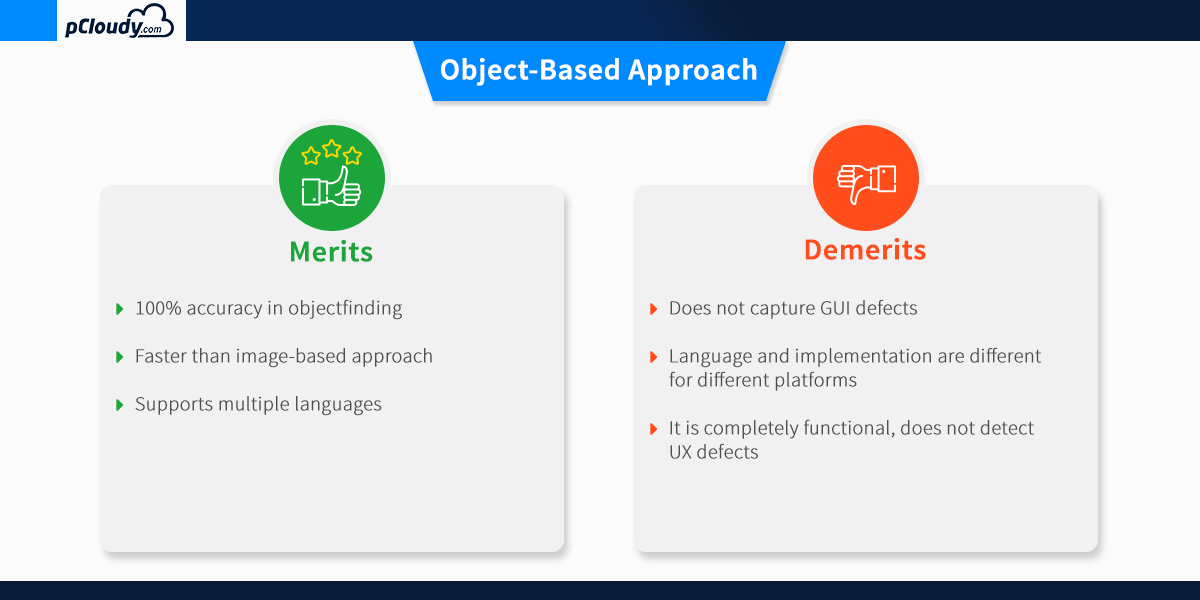
This technique of test automation is based on recognizing the nativity of the objects in AUT. This nativity reorganization process for each individual object in the application is carried out using different attributes that are assigned to the object.
It is used to extract the application object identifier with its properties from the actual native operating system source code, just like the developer used. This is an accurate and fast method to recognize the buttons, lists and other objects used by the application.
One drawback of the object-based approach is that the recognition of the individual attributes of the object involved restricts these techniques ability to function in test scenarios that require third-party application access. This reduces the automation coverage of utilizing this technique.
Which approach should we choose?
As we have seen, both approaches have their pros and cons. To get better results, you can merge both approaches and think about devising a hybrid test automation solution.
The combination of OCR (image based) and native (object-based) approach allows users to build a single script that will be portable across different devices. It will make your automation robust and efficient and allows the users to confidently detect the relevant native and GUI defect within the mobile application.
Appium Overview and Architecture
Appium is an HTTP server that manages WebDriver sessions. On iOS devices, Appium proxies command to a UI automation script running on Mac Instruments environment. Apple provides an application called instruments which are used to do a lot of activities like profiling, controlling and building iOS apps. It also provides an automation component where you can write some commands in JavaScript which uses UIAutomation APIs which interact with the app user interface. Appium mobile automation uses these same libraries to automate iOS apps.
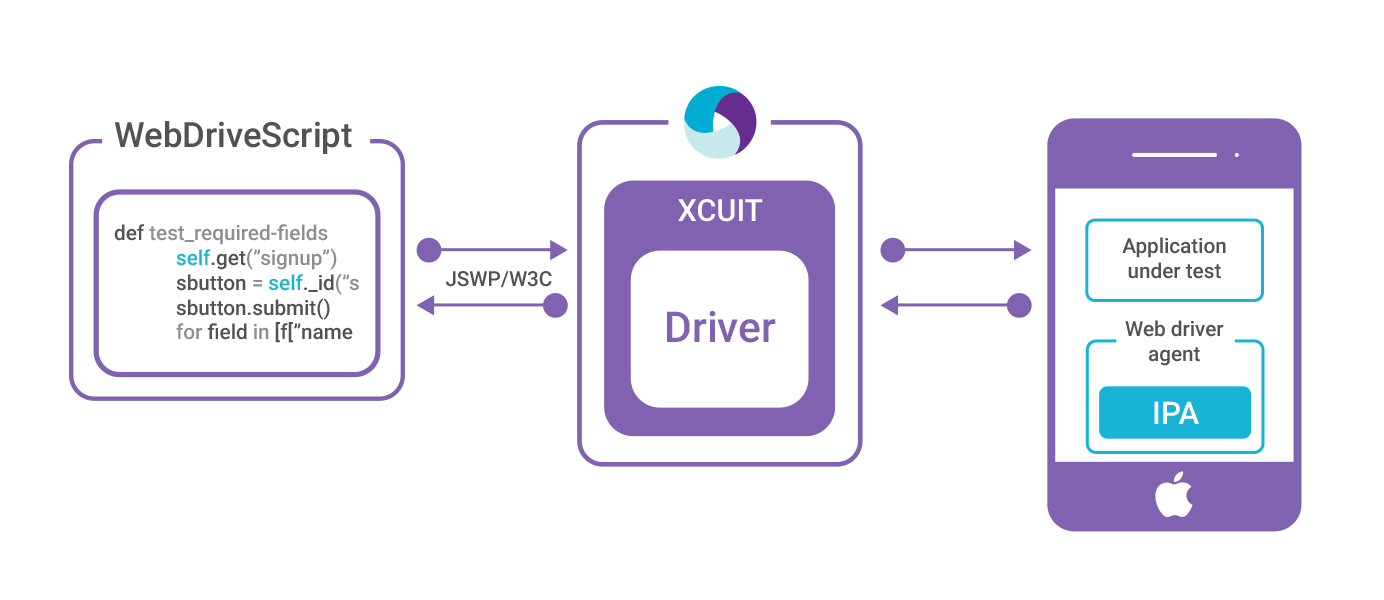
The Webdriver Script sends a command in the form of HTTP (JSWP) to the Appium Server. Then the Appium Server will then decide as per the request which driver should be initiated. So, in this case, the Appium Server will initiate the XCUITest driver and it will pass the request to the WebdriverAgent which is an IPA (WebdriverAgent.xcproj) developed by Facebook. WebdriverAgent is responsible to send the command to the Application Under Test (AUT) to carry out the actions in the app. Then the response will be sent to the Webdriver Script through the Appium server.
Only iOS 9.3 and above version are supported by the XCUITest Driver. You can find all the capabilities for XCUITest Driver in the link mentioned below.
https://github.com/appium/appium-xcuitest-driver
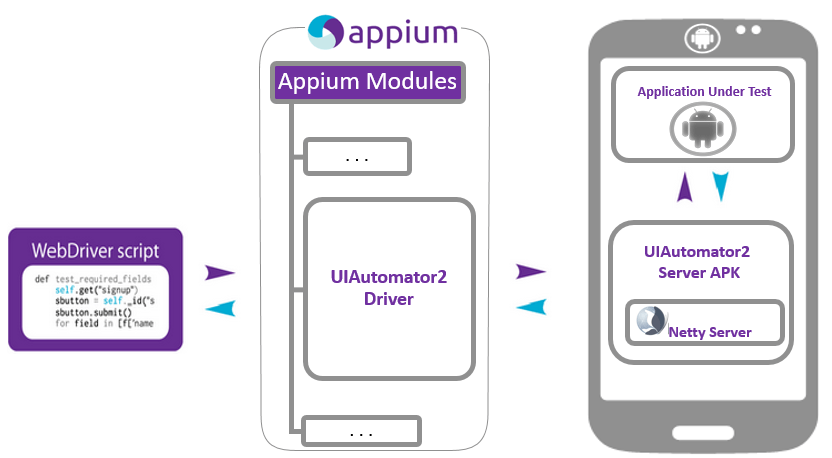
The situation is very similar in the case of Android where Appium proxies command to a UIAutomator2 test case running on the device. UIAutomator2 is Android’s UI automation framework which supports running JUnit test cases directly into the device into the command line. It uses Java as the programing language but Appium will make it run from any of the web drivers supported languages.
To answer the question “what is Appium automation?”, let’s have a look at the Appium philosophy.
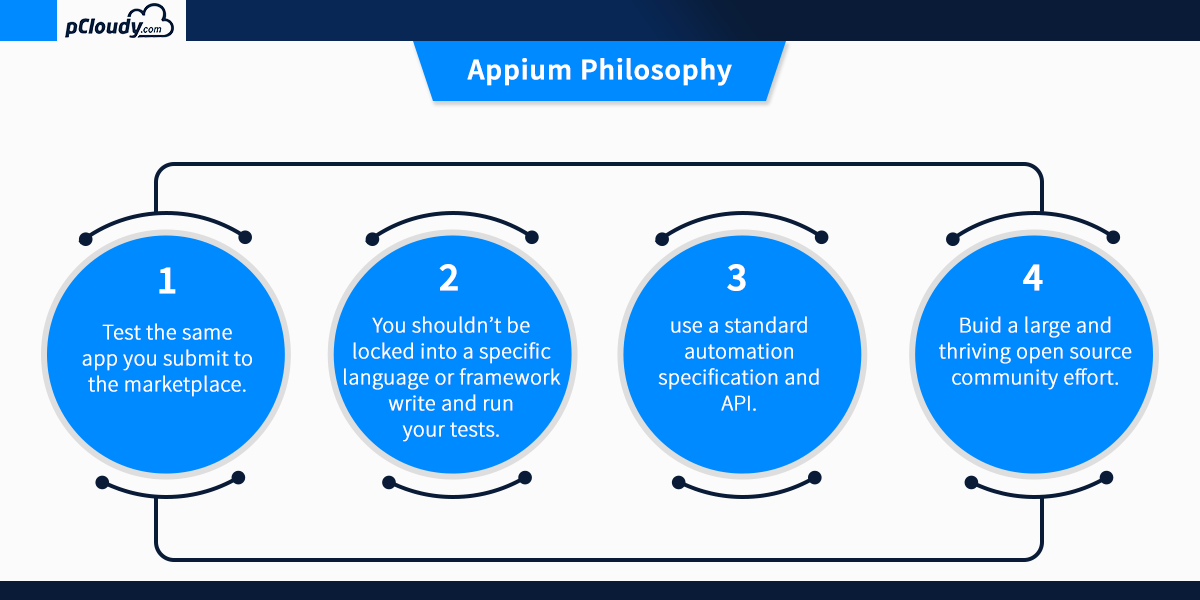
Appium mobile testing is required for proper execution of continuous integration as it speeds up the overall testing process. Appium mobile testing helps to run the repetitive test which would take more time to perform manually. This is why appium mobile testing is the preferred choice for the developers when it comes to test automation.
In the next blog, we will learn more about Appium mobile testing and how to install/configure the Appium setup on a windows machine.
Related Articles:
June 21st, 2019 by Suyash Dubey
The efficiency of the software development life cycle is what differentiates a successful app delivery to a faulty one. The industry is emphasizing on the need to increase the productivity of the development process with speedy deployment. This can be achieved with continuous integration and continuous delivery. In agile development, there is a constant need to test the code regularly with continuous integrations of the builds. Jenkins helps in optimizing the CI/CD process. So let’s start with Continuous integration and then we will move on to the role of Jenkins in achieve continuous integration.
What is Continuous Integration
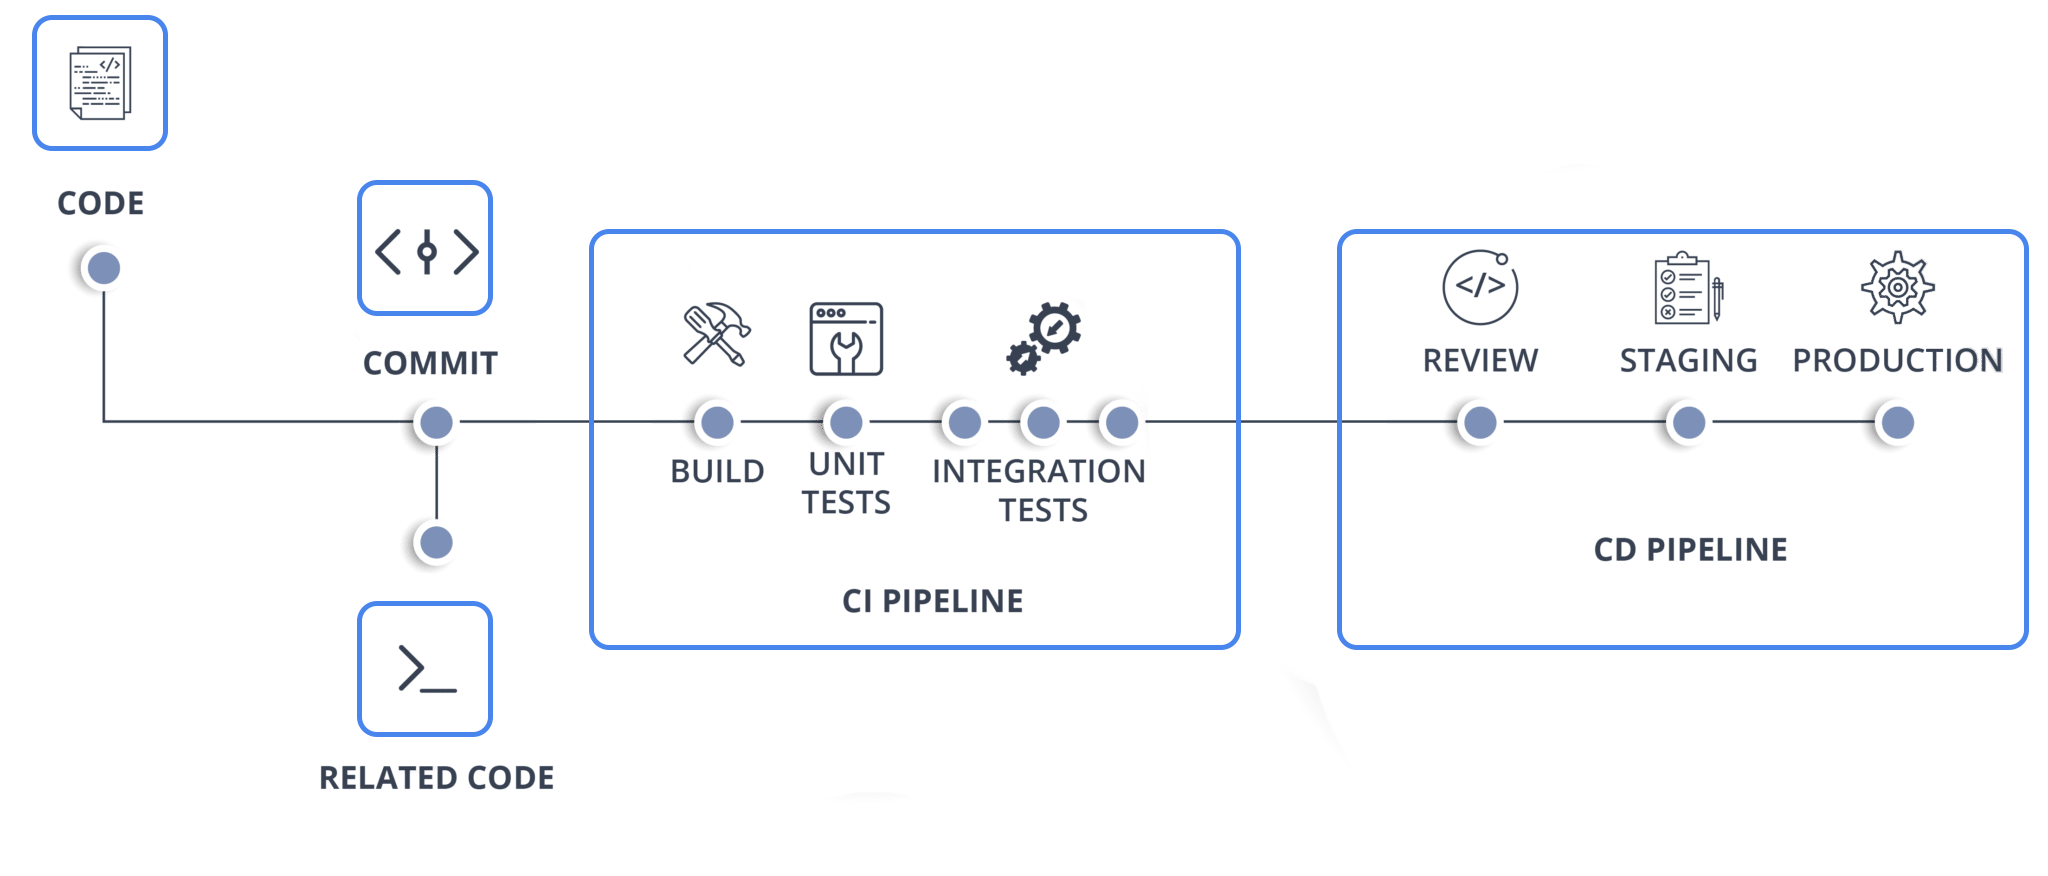
Continuous integration is a process in which multiple commits are made every day and each commit code is built and tested immediately. Once the test is passed the build is tested for deployment and then it is sent to production. A CI/CD pipeline consists of Continuous Integration server like Jenkins, Source Control tool, Build tool, and an automation testing framework like Selenium, Appium, etc. There are many benefits of continuous integration and according to the project requirement, the development team can choose the best continuous integration tools.
What is Jenkins
Jenkins is an open-source server-based application written in Java used to achieve continuous integration in an automated fashion. It is popular because it makes monitoring the repeated task which arises during the development phase. While working on the project, Jenkins automation will continuously test the builds and recognize the errors in the early stages of the development. Jenkins speed up the software development process by automating the build and test quickly.
Why CI needs Jenkins
When a team of developers works on a project and uses a shared repository, some might take 20 days and others might take 25 days to complete. When the developers were done with their coding, they used to commit at the same time and then the build was tested. This way a single build was done after many days. But with Jenkins, build, and testing of code can be done many times in a day. Once the testing is done then the source will be deployed into the test server. Jenkins will notify the developers if the build fails.
Since the code was built all at once, some developers would have to wait for others to complete which is not efficient. It was difficult to detect and fix bugs for multiple commits. Now with Jenkins, once the developer commits, the code is built immediately and thus it is easy to find the code that causes build failure.
Earlier the code build and test process were done manually and this was the reason for more number of errors. This is rectified by the automated build and testing in Jenkins.
One more issue was that code was deployed when all the bugs were fixed and this made the development cycle slow. Jenkins helps speed up the process as the code is deployed after every build and test.
Advantages and Disadvantages
The best thing about Jenkins is that it is open source and the community takes feedback from the users for enhancement of the project. In every three months, there is a stable release and there are more than 320 plugins are published in its plugins database. It also supports cloud-based architecture and it can be integrated with cloud-based platforms.
Some flaws include its outdated user interface and lack in the overall user experience in some ways. It runs on a server which requires more maintenance and skills to install, configure and monitor the activity. There will be some issues with the setting changes and the continuous integration will break which will need developers attention.
Use of Jenkins to Achieve CI/CD Pipeline with pCloudy
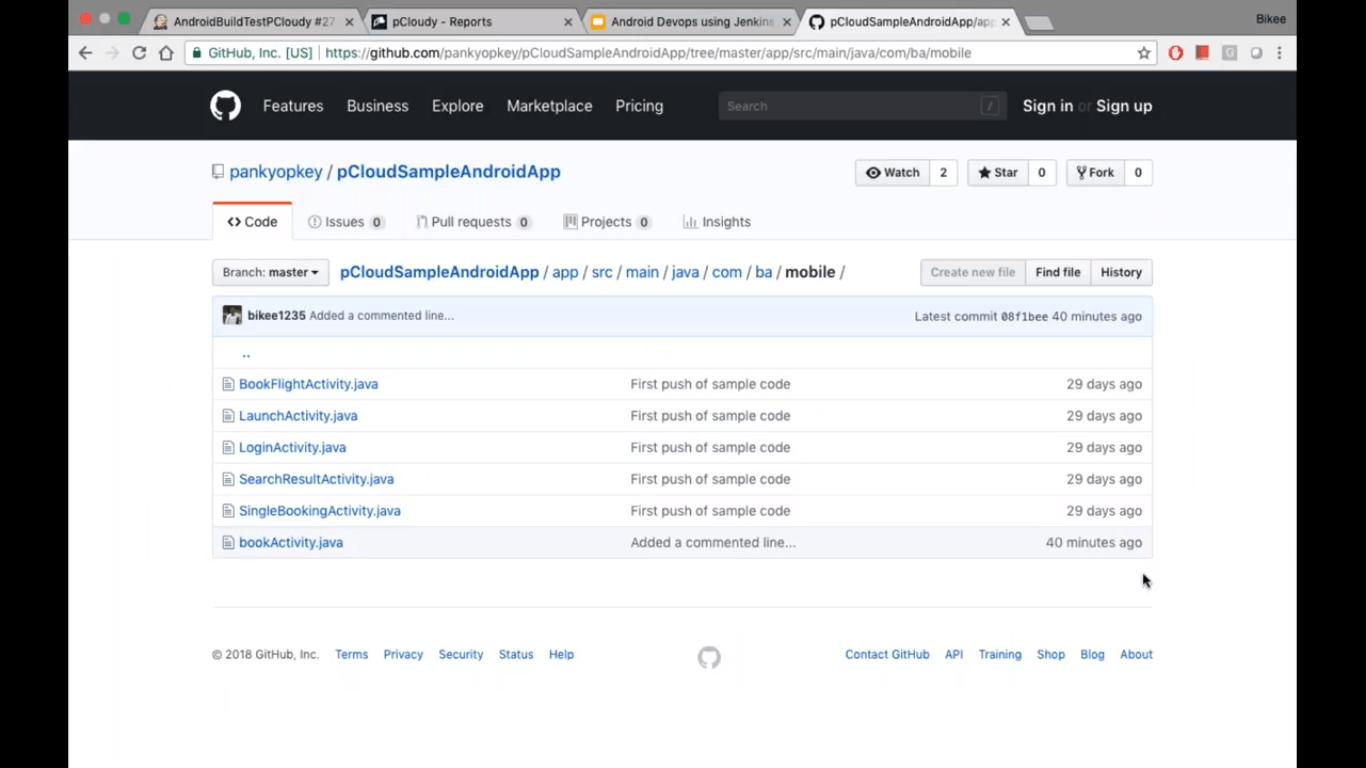
Here we can see a sample app code that will be used in this process.
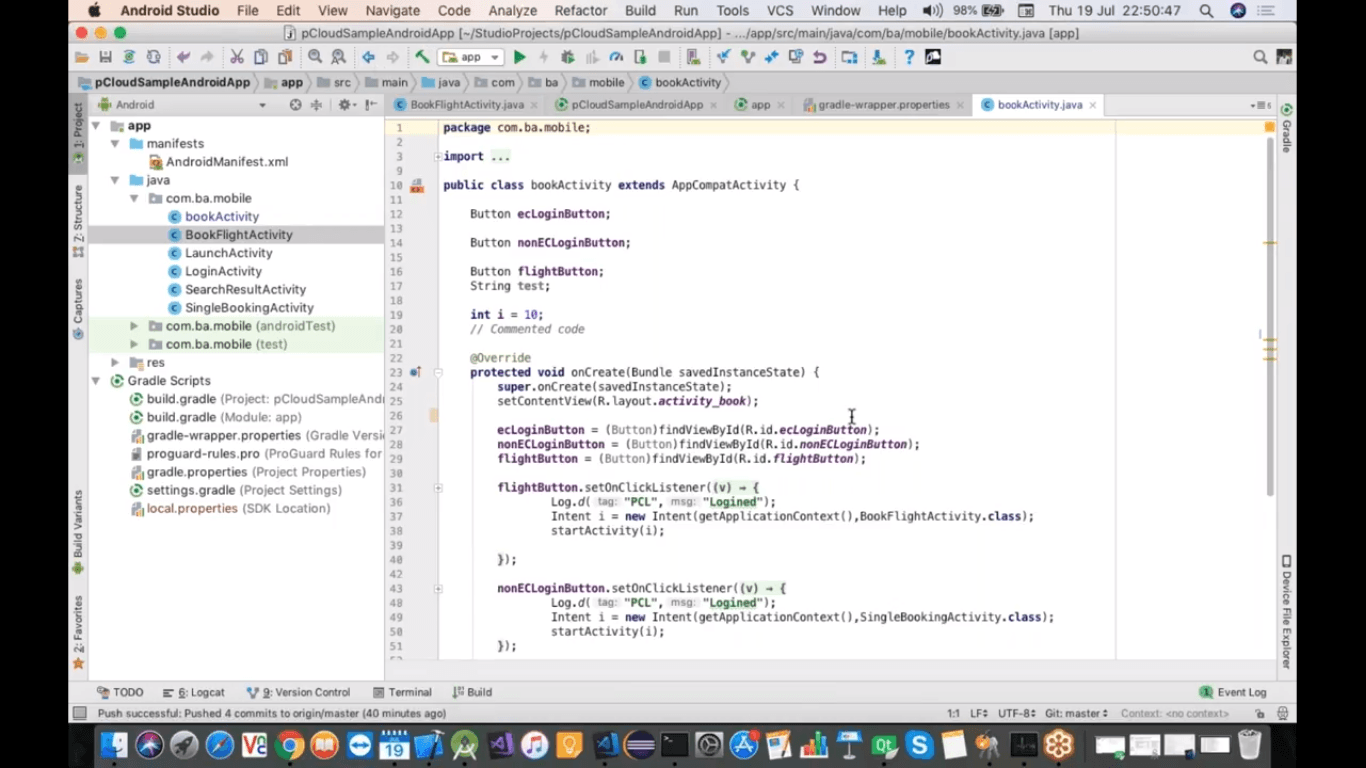
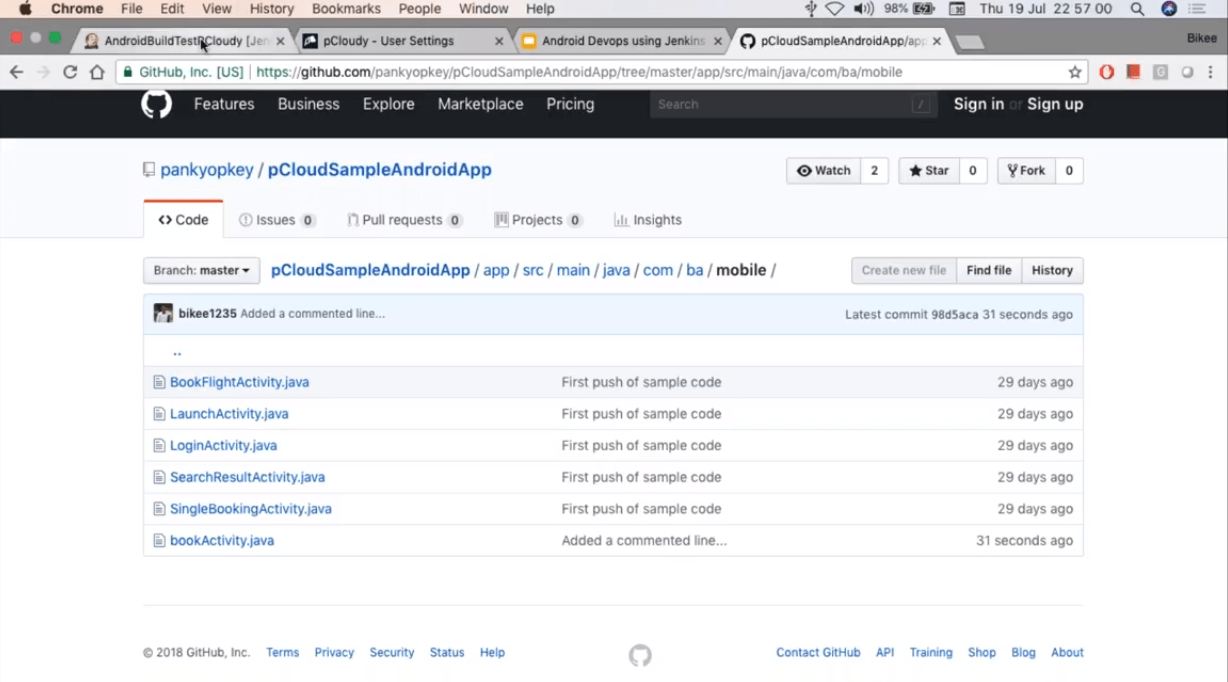
This app is also hosted on Git as shown in the figure.
Go to the configuration page in Jenkins for this project.
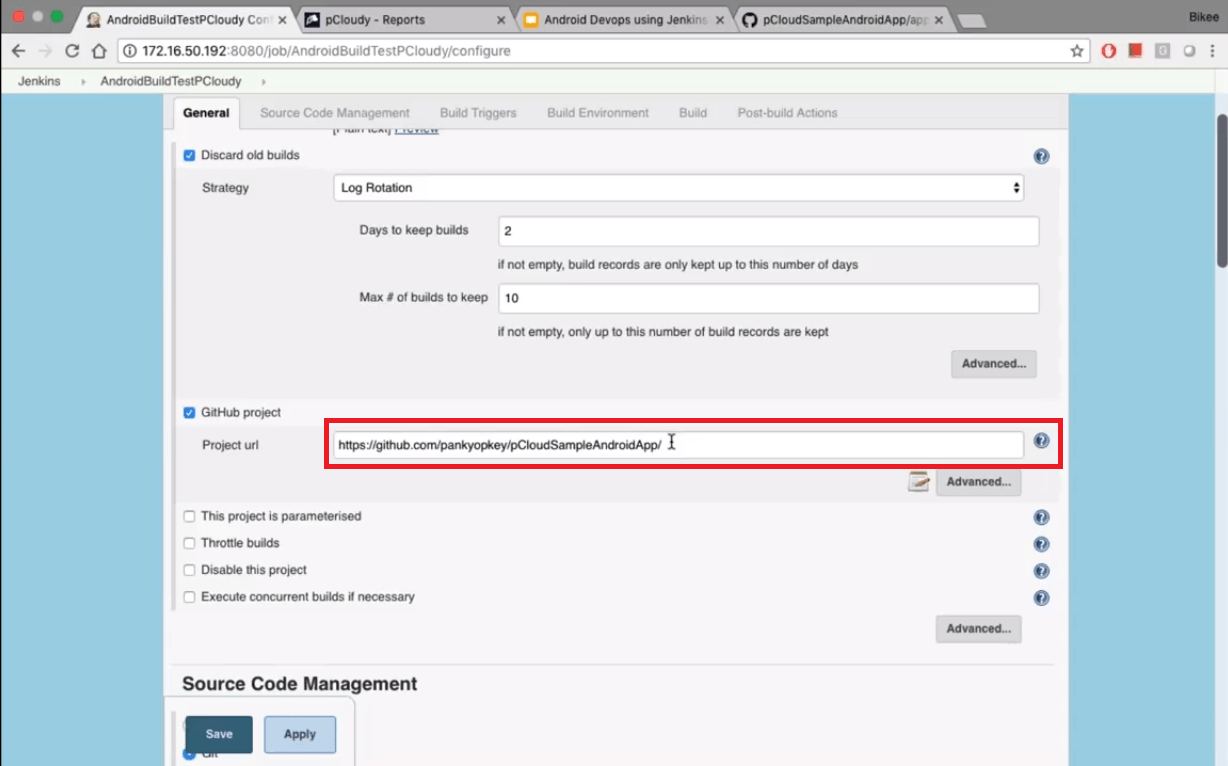
We have configured it to pCloudySampleAndroidApp. Jenkins will pick up this project from the location and build it. Then we need to get the Github access and branch to pick the code. The source control mechanism should be polled with a schedule.
In this build, we will build the android studio project using Gradle wrapper.
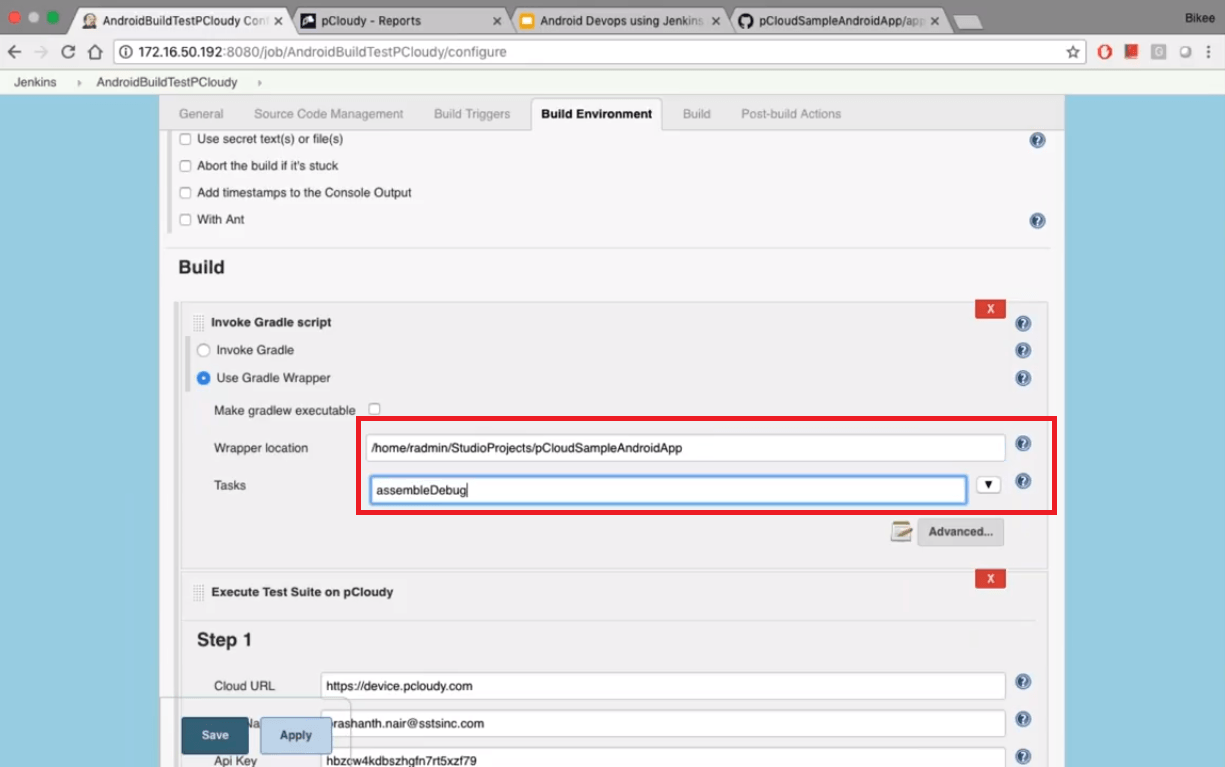
Here we can see the location of the Gradle wrapper and the task that needs to be performed by Gradle.
Next step is to integrate Jenkins and the plugin can be taken from the pCloudy website.
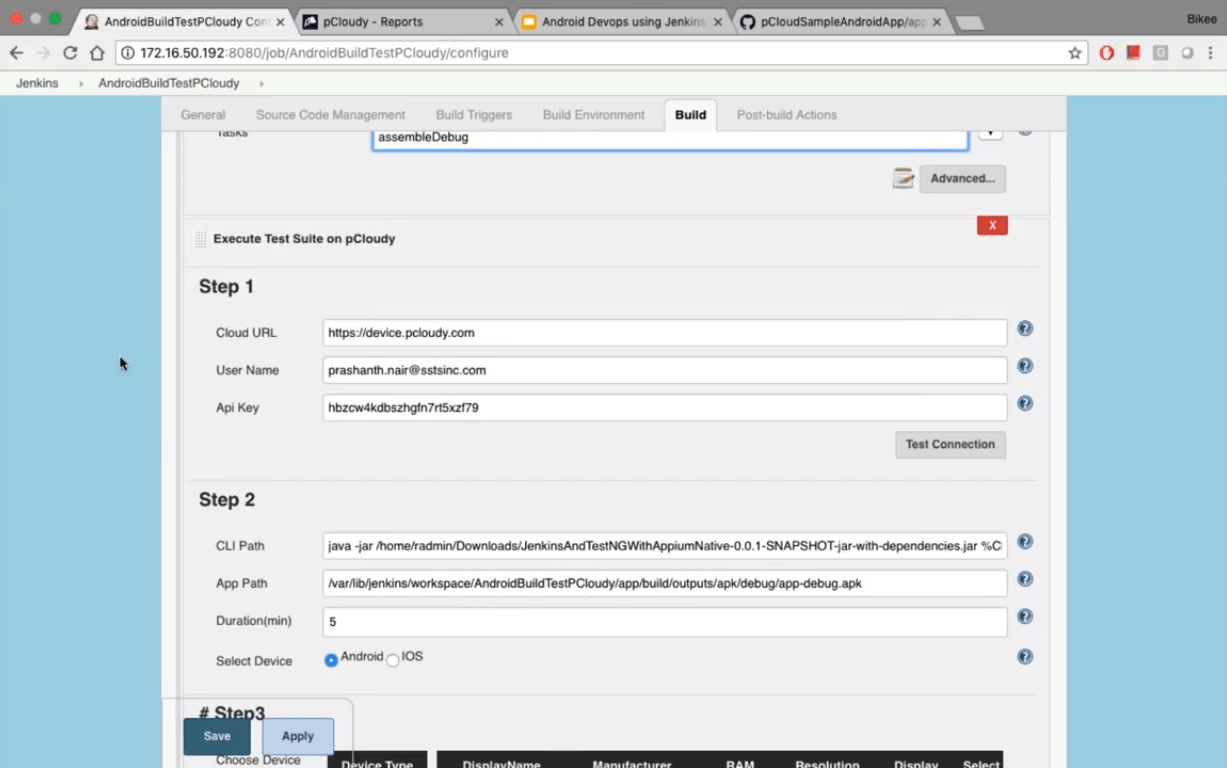
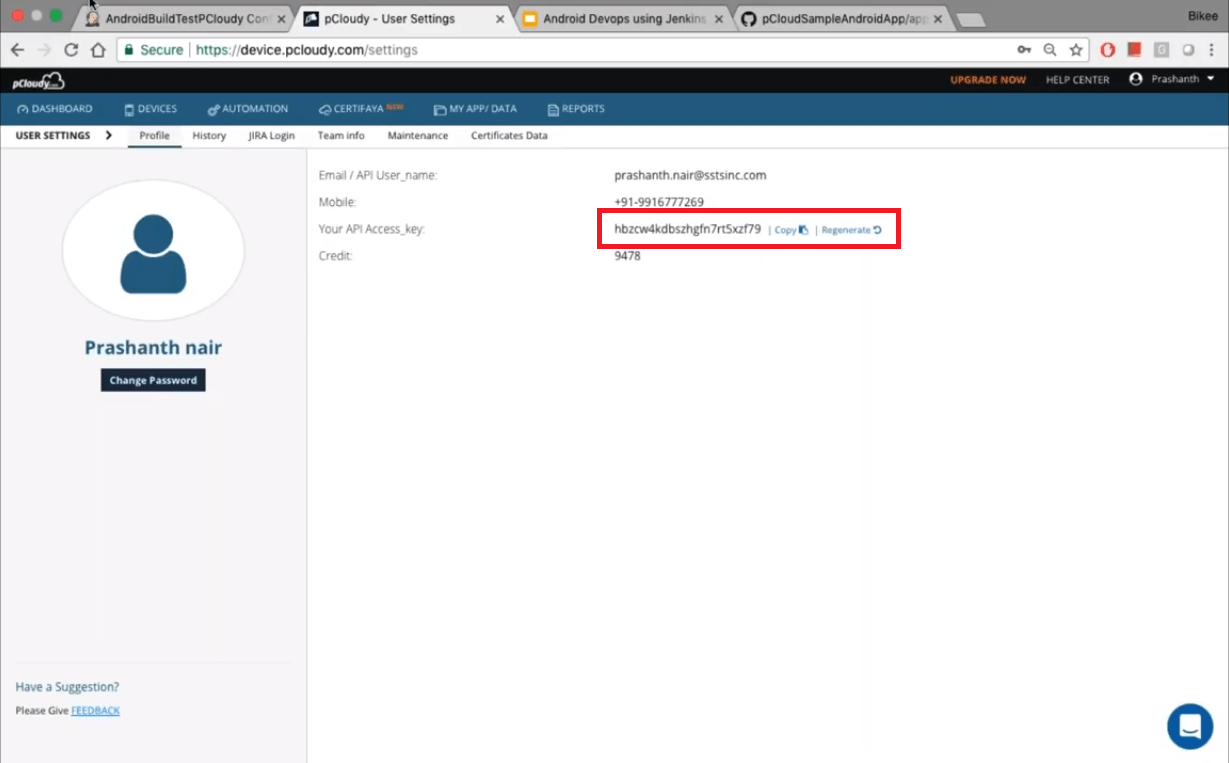
In Step 1, we have mentioned the URL of the device cloud followed by the user name and the API key. You can retrieve your API access key by going to the settings page in pcloudy.
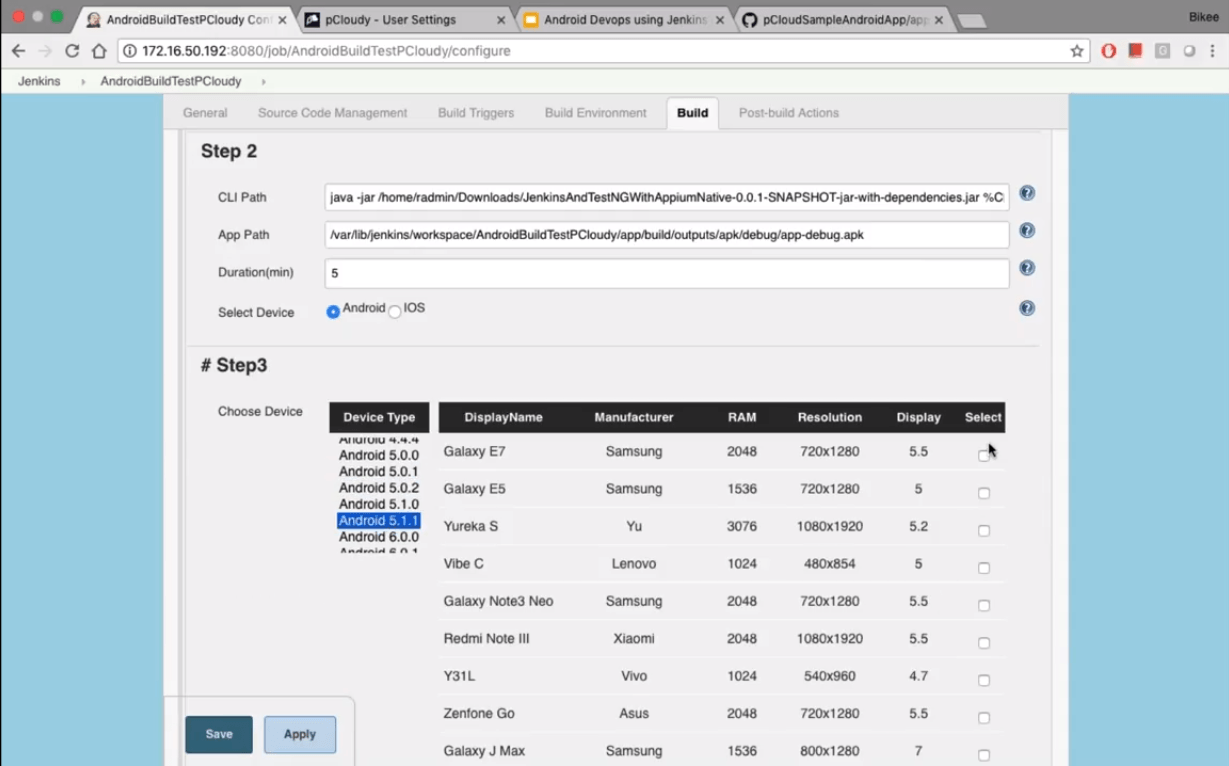
In step 2 we need to provide the command line path where we have mentioned the Appium Jar file which has the test cases. Next, you need to give the path of the app that has been build by Jenkins and then mention the automation duration.
In step 3, we can choose the device on which we want to run the Appium. So you can select the Android version and select the preferred device with desired specifications. We selected two devices for the process.
Now we can go back to the code and check how the entire configuration comes together.
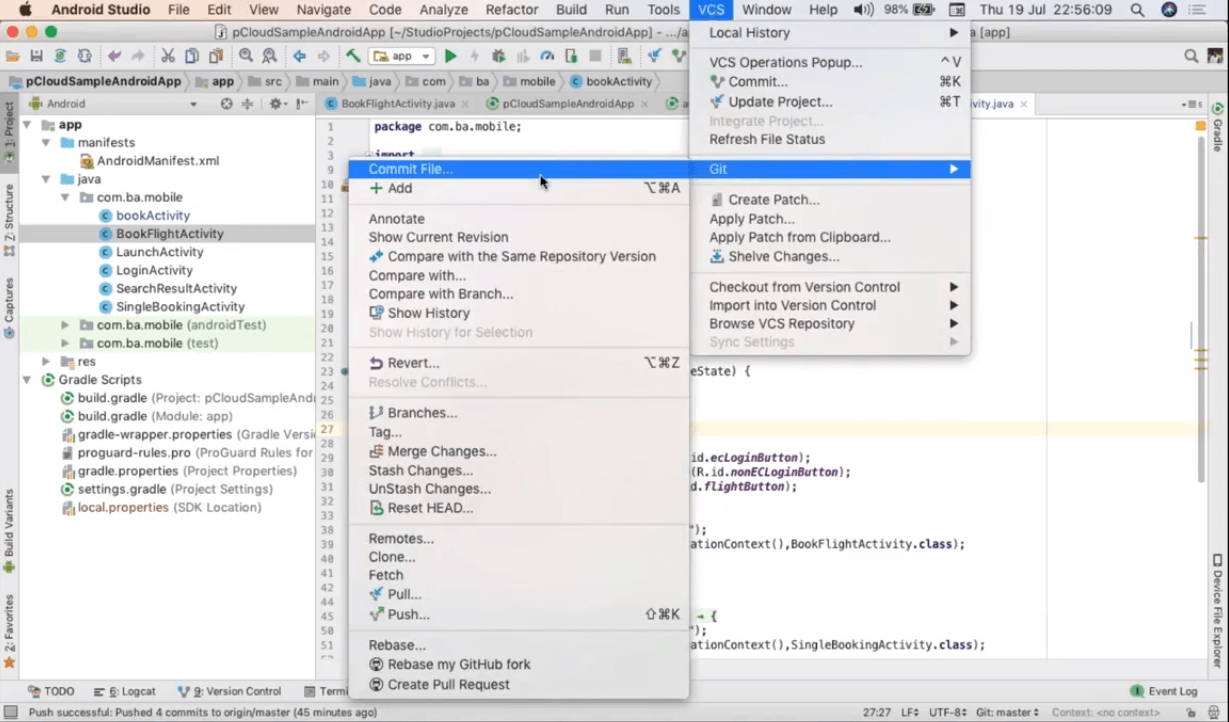
After making the changes in the code, go to the version control system and add a commit.
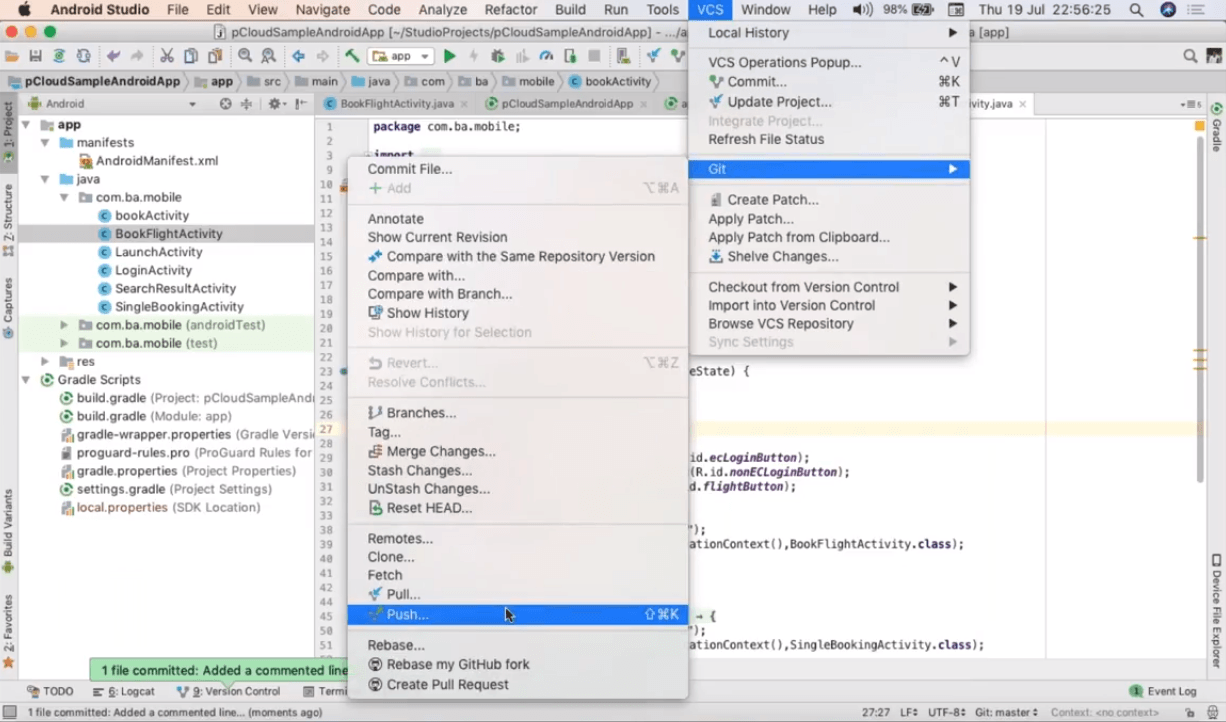
After that push the code. Once the push is successful you can check in the Git if it is showing the code change.
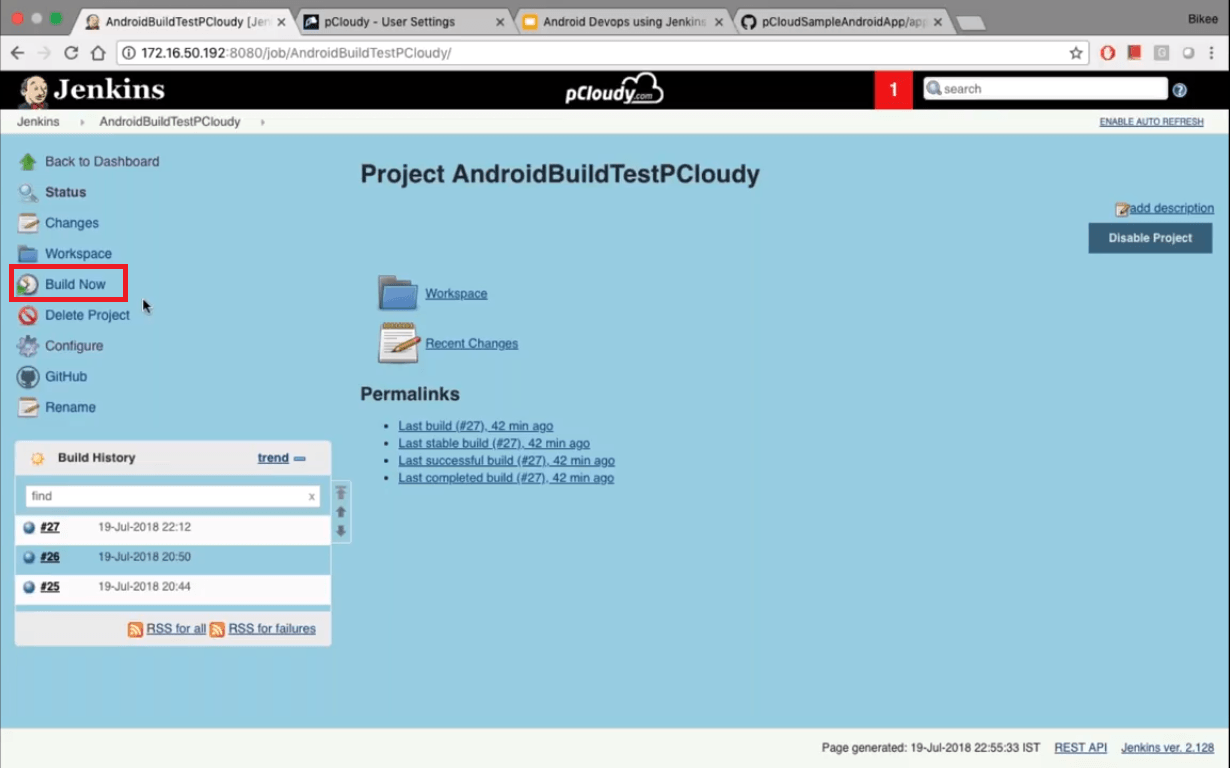
Now again go to Jenkins and click on “Build Now”.
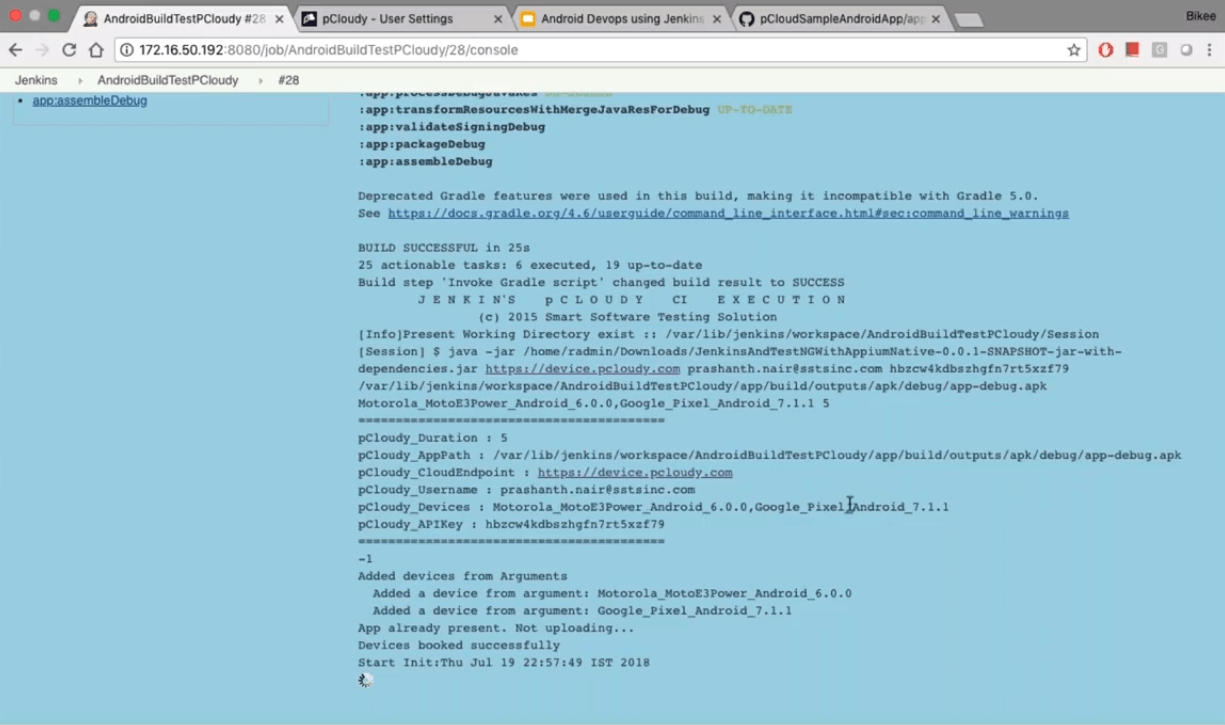
In the next screen, we can see the initiation of Gradle Daemon.
Now go to active sessions in device.pcloudy to see the live view of the activity in the devices.

So this is how you can make changes in the code and push the code into Git from where Jenkins download the code and upload the build into pCloudy. This process takes a few minutes and we were also able to see the test activity live which is an advantage of integrating the Jenkins based build system with pCloudy’s automation.
Conclusion
Jenkins is like the soul of the continuous integration process as it builds and tests the app continuously which makes it easier to integrate changes to the process. Most of the process is automated and this saves time and effort which can be used to perform other tasks related to the delivery. It has some issues like the old UI but the benefits like an active opensource community overshadow the little disadvantages. This is why Jenkins is the most popular CI server among the developers.
Related Articles:
pCloudy Plugin for Jenkins
pCloudy Sponsors Jenkins World 2016
Integration of TestNG Project with pCloudy Platform
Appium Integration Architecture Redefined! Appium Runs Become Simpler with pCloudy
Explore Full Power of pCloudy Platform – Improve Quality, Speed and Efficiency
May 24th, 2019 by Suyash Dubey
End to end testing is done to make sure that the application behaves as expected and the flow of actions from starting to end is complete without any issue. To explain with an example, suppose you are the end user and you are using the app to book a flight. So first you will launch the app and click on the flight’s icon on the home page. Then you will enter the destination, date and other required details. Now you will choose your preferred flight, book the seat, enter the passenger details and make the payment. Once this is done, you will get the ticket and a follow-up email on your registered email ID.
Now in this scenario, if the screen takes a lot of time to load the next page or if the book button does not work then this will be an unpleasant experience for the user. So we can figure out if there are any issues from starting to the end of the process. It’s not just about the UI functioning but also the data encryption and security, information flow between other internally used platforms integrated to the app, proper functioning of the firewall and more. This is where end to end testing comes into the picture to make sure that everything works well under any circumstances.
How to Perform End to End Testing
While performing end to end testing the first thing to do is to analyze the requirements and set up the test environment. Then you need to evaluate the main system with the connected subsystems and define the responsibilities of all systems involved. Make a list of the testing methods and the description of the standards to be followed. Once that is done you can create the test cases and track the requirement matrix. Finally, you need to save the output and input data before testing each system.
Measuring the success of the end to end testing
To perform end to end testing efficiently and save time and effort, a matrix should be created. Some parameters should be defined to gauge the success of the testing performed. These measurements will help you define the testing matrix:
Test case status: A proper visualization of the test cases prepared can be observed through graphs and compared with the number of tests that were initially planned.
Tracking Test progress: This measurement will help you to get the details of the tests completed on a weekly basis. It will be easy to keep a track of the test that failed and those that passed.
Defect details: Tracking of the bugs occurred and the issues surfaced should be done one a weekly basis and keeping a track of the defects that were opened and closed on the basis of priority.
Environment availability: Here we need to take a note of the amount of time allotted for running a test in an environment and the time actually spent on performing end to end testing.
Best Practices to Perform End to End Testing
End to end testing can be very time consuming and we can save some time and effort by following some steps. It is always better to plan in advance before initiating the testing process.
Prioritize: Chances of defect increases as the test cases become complex with more components and it becomes difficult to debug them. Therefore it is better to perform unit testing and integration testing to resolve issues that are easier to detect. After initiating the End to end testing you can also start doing smoke and sanity testing to keep an eye on the high-risk scenarios.
Manage the Environment: The requirements need to be documented and the system administrator needs to be informed about it to meet the requirements before starting the testing. The system setup should be proficient enough to run the test cases and keep your staging environment close to the production.
Optimize: After test completion, you need to clear the test data so that the environment is restored and can be used for testing again. This will make the environment ready to start at any moment.
Risk Analysis: Focus on the features that are crucial and on failure can cause a high risk. Prepare a risk assessment matrix which will come in handy in these situations.
Limit Exception testing: Use low-level unit testing and integration testing for exception scenarios and use end to end testing to deal with typical user scenarios.
Conclusion
With the rapid enhancements in the app technology and the increasing use of technologies like IOT, the development teams have to make sure that the app has a smooth functionality. The end users can be very choosy in this competitive market and so it’s necessary to perform end to end testing of applications to provide a good user experience.
Related Articles:
Start to End Guide for Mobile App Testing
5 Best Practices App Testing Companies Must Follow for Success
Top 5 Tips for Successful Mobile Application Testing
Mobile Devops+Agile – Challenges and Keys to Success
Functional Testing Vs Non-Functional Testing
May 6th, 2019 by Suyash Dubey
DevOps helps enterprises to build software at a fast pace and with minimal issues. The time to market is accelerated and the bugs are fixed faster in continuous deployment with the help of automated tools. AI is much in line with DevOps as the main focus is on automating the process and with AI the system can identify patterns, anticipate issues and provide solutions. The proactive approach improves the overall efficiency of the software development life cycle. So let’s have a look at how AI is transforming DevOps.
Feedback Loop and Correlate Data
The main role of DevOps is to take continuous feedback at every stage of the process. often people use performance monitoring tools to get feedback on running applications. These tools gather much information in the form of log files, data sheets, performance matrix, and other types. The monitoring tools use machine learning to identify the issues early and make suggestions. The DevOps teams use these suggestions to make the necessary improvements to the application. Many times teams use two or more tools to monitor the health of the app and the data from all the platforms can be correlated by the help of machine learning to get a more deep understanding of the app functioning.

Software Testing
AI is changing DevOps for good by enhancing the software development process and making testing more efficient. Whether it is regression testing, user acceptance testing or functional testing, these all produce a large amount of data. AI can figure out patterns in the data collected in the form of results and identify poor coding practices which produce a lot of errors. This information can be used by the DevOps teams to increase their efficiency.
Anomaly Detection
DevSecOps is one of the essential aspects of software development as security is the key to any successful software implementation. Distribution denial of service attacks are increasing and the business needs to prepare themselves to protect their security systems from hackers. DevSecOps can be augmented using artificial intelligence to enhance security by central logging architecture to record threats and running machine learning based anomaly detection. This will help businesses proactively attenuate the attack from hackers and DDOS.
Alerts
DevOps approach might create scenarios where the team receive an overwhelming amount of alerts without any priority tag. This will create ruckus in the teams as it will be very difficult to handle all the alerts in the continuous development environment. AI can help in this scenario by tagging the alerts and prioritizing them so that the urgent ones can be worked upon immediately.
Root Cause Analysis
To fix an issue permanently, a root cause analysis is necessary. Although it might take time to do it compared to fixing the issue with a patch which will provide the instant solution. In order to find the root cause of an issue, the developers will have to spend time which will delay the release of the product. AI can speed up the process by finding patterns in the data collected and implement to fix the root cause.
The collected data can be used by implementing AI to find a pattern and speeding up the development process. The organized data is more useful and makes prediction possible. The best practice is to use machine learning to automate the tasks which are time-consuming which will ensure the smooth and effective functioning of the DevOps teams.
Related Articles:
Bureaucracy And Other Unlikely Roots of a Fledgling DevOps
Mobile Devops+Agile – Challenges and Keys to Success
pCloudy’s DevOps Journey: Lessons Learnt While Scaling Up!
Moving Beyond Traditional App Testing with AI and DevOps
Code Review in a Startup: Balancing Perfectionism and Sanity at the Speed of Thought
April 24th, 2019 by Suyash Dubey
Software testing has evolved a lot since the time when the waterfall model was used. All the work was done in a sequential manner and only after the development phase was complete the testers used to test the product. Testers used to find bugs but a lot of time and energy was wasted in the process to rebuild and code again.
Now companies are using an Agile model where the main goal is to find the bugs in continuous development, fix them quickly and release the app faster. There is a need to improve the automated testing process to complement the manual testing. More emphasis has been given to CI, CD, and DevOps to make the software development effective.
There has been a considerable change in the functioning of testing tools and test automation frameworks. The most important change is the introduction of AI in a test automation strategy.
According to G2Crowd, AI-powered bots are expected to cut business cost by $8 billion by 2022. Testing bots are already empowering automation testing and will play a major role in reducing the time and effort spent in mobile app testing.
Let’s have a look at how AI is breaking new ground for test automation.
1. Running automated tests that matter
It’s not a good strategy to run your entire test suite due to a very small change in your app that you couldn’t trace. You are probably already generating a lot of data from your test runs if you are doing continuous integration. But it will take a lot of time to go through the data and search for common patterns. So you need to know if you make a small change in code then what is the minimum number of test you need to run to figure out if the change is needed or not.
2. Reducing maintenance and eliminating flaky test
We can run several automated tests on a daily basis to ensure the functionalities of the app are still stable. Although, if we find out that half of this test failed. In that case, we would need to spend a lot of time to troubleshoot the failures and investigate the cause. Then there is a need to find ways to fix the failures and then work on the changes.

Using AI we can avoid issues and start detecting issues in the test before they even occur. So instead of reacting to it, we can proactively fix tests. AI can figure out which tests are stable or flaky based on the number of test runs and it can tell us what test needs to be modified to ensure test runs are stable. AI can also handle test running on different resolutions and can optimize the wait time used in the test to wait for the page to load.
3. Dependencies on other modules
Writing a test for systems having dependencies on other modules is also a challenge. AI can help us to mock responses from a database or server. The AI can start recording server responses once we have written the test and have run them for a period of time. So the next time we run the test it will access the stored responses and will continue to run without any obstacles. This will speed up the process as the delay in response is eliminated and the server or physical database is no more needed.
4. Learning from production data
Real user data can be used to create an automated test and with the help of AI, we can observe and learn how the customer is using our product. We can identify common actions such as search option, using filters, login/logout, etc and compile them into reusable components. These components can be used for our test as well. Therefore, we have an actual test written by AI based on the real data along with the reusable components.
5. Easy execution of tests and speeding up the release
In automation testing, the time and effort it takes to write and execute a test is a major challenge due to the complexity of the test automation tools, app, and programing language used. To mitigate these problems AI-based tools are being used. The use of dynamic locators and reusable components has made it possible to write and execute a test in hours which earlier used to take a week.
Conclusion
The DevOps theory says test early, test often, but this puts a lot of responsibility on the testing team. Also, it’s not feasible for testing teams to spend time to do exploratory testing manually for each new release. AI-based tools can perform codeless automation testing which will save us time and resources and give the testers some space to breathe.
Related Articles:
March 27th, 2019 by Suyash Dubey
Appium vs Espresso
Mobile app automation testing has evolved as a crucial aspect of the mobile app development process to help deliver better quality solutions, under controlled time cycles and cost schedules. But for delivering bug-free app, choosing the best suitable automation testing framework for your app is very important. There are many automation testing frameworks available in the market with exceptional capacities. This blog is all about Appium vs Espresso and we will analyze which of these two most widely used Automation testing frameworks is preferable for your app testing.
Espresso was not preferred because of its flakiness and instability issues. But, from the time Google has brought Android Test Orchestrator, a Gradle test option, instability and unreliability of Android Espresso tests have vanished. This, in turn, is creating a serious problem for the most popular automation framework Appium.
Let’s find out in this blog if Espresso now comes with a power to kill Appium or Appium can hold its stand in this fiercely competitive market.
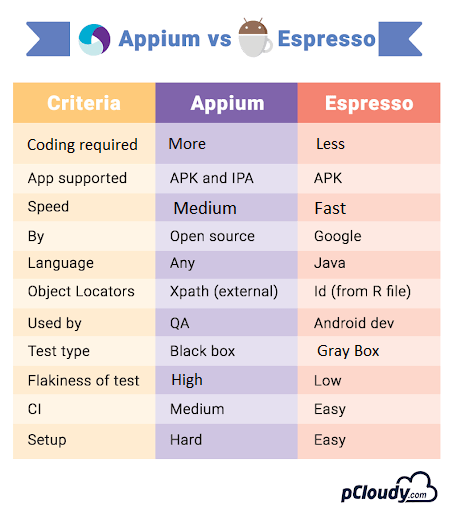
Let’s get into the details.
What is Appium?
It is an open source, cross-platform mobile app automation testing framework. Appium allows native, hybrid and web app testing and supports automation test on physical devices as well as emulators or simulators. The Appium server uses selenium web driver which permits platform independence and allows the user to use the same code for Android or iOS.
Advantages of using Appium
- Facilitates test execution without server machines
Appium is developed using cross-platform runtime environment like NodeJs which enables programmers to write server-side code in javascript. It is designed as an HTTP server and you can run the test without requiring a server machine.
- Does not require app code recompilation
Most of the automation testing tools require testers to alter app code. Some of the test automation frameworks require testing professionals to recompile the code according to the targeted mobile platforms. Appium enables testers to evaluate both cross-platform and native apps without recompiling and altering the code that often.
- Automates various types of mobile apps
Testers can avoid using different automation tools for different types of apps as Appium can be used for web apps, hybrid, and native apps too. It facilitates the testing of hybrid and mobile web apps as a cross-platform test automation framework. At the same time, it enables testers to test native apps through web driver protocol.
- Testers can use real devices, emulators, and simulators
Testers use real devices to evaluate mobile app’s usability and user experience more precisely. Although, to speed up the mobile app testing one needs to use emulators or simulators too. Appium helps testers to produce reliable test results and reduce testing time by supporting real devices, emulators and simulators.
- Provides a record and playback tool
In Appium, testers can use the inspector to accelerate testing through record and playback functionality. Appium inspector can record the behavior of native apps by inspecting their document object model (DOM). Record and playback tool can produce test scripts in a number of programming languages.
- Testers can automate apps without adding extra components
Testers can execute the same test across multiple mobile platforms without putting extra time and efforts or adding extra component. Appium simplifies automation by keeping complexities in Appium server.
- Supports several web driver compatible languages
You can integrate Appium with many testing frameworks and WebDriver – compatible languages including PHP, Java, Ruby, Javascript, C# and Objective C. Hence, a tester has the option to write test scripts in his preferred programming language.
Disadvantages of using Appium
- Common gestures
Appium lacks commonly used gestures like double-clicking in java-client libraries. It also does not support Android alert handling directly and the users cannot evaluate alert handling through native API. Testers have to put extra time and effort to test these gestures.
- No script execution on multiple iOS simulators
Simulators make it easier for testers to mimic internal behavior of the underlying iOS devices. Although Appium does not allow users to run multiple test scripts on multiple simulators simultaneously.
- Lacks the capability to recognize images
Appium cannot locate and recognize images automatically to evaluate games and apps precisely. The testers have to take help of screen coordinates to make Appium locate and recognize images.
- Does not support older versions of android
Appium supports only Android 4.2 and later and does not supports older APIs for Android. There are still many people using devices which run on older versions of Android and developers find it difficult to test mobile apps developed targeting older Android API level.
What is Espresso?
Espresso is a tool developed by Google which is used for testing the UI of Android apps. It automatically synchronizes your test actions with the user interface of the mobile app and ensures that the activity is started before the tests run.
Although when you execute an Espresso test you will have shared state in separate tests and some flakiness. For this Google came up with a solution. Android Test Orchestrator is a Gradle test option that helps in testing and increases the reliability of our automated test suites.
If you use Gradle build tools in any version of Android Studio below 3.0 then you also have to update the dependency setup. Let’s take a look at the advantages of using Android Espresso.
Advantages of using Espresso
- Integration with Gradle
The new Android Espresso now has the power of the Android Studio and Gradle that comes along with it. So now invoking your tests, running it or modifying it is just a matter of calling a Gradle command. This gives the full power of command line to the developer and makes testability much easier.
- Test Orchestrator
The new Android Espresso comes with the power of Android Test Orchestrator that allows you to run each of your app’s tests within its own invocation of Instrumentor. It ensures that there is minimum shared state and crashes being isolated. It allows you to filter the tests that you want to run and also distribute tests across devices. This implies that you have finer control over how your tests run.
- Less flakiness
The scalability of the test cycle in Android Espresso is high due to the synchronized method of execution. A built-in mechanism in Espresso that validates that the object is actually displayed on the screen. This saves test execution from breaking when confronted with “Objects not detected” and other errors.
- It’s easy to develop Espresso test automation
Test automation is based on Java and JUnit which Android developers are familiar with. There is no setup or ramping up to implement quality in the in-cycle stage of the app SDLC.
- Reliable and fast feedback
Android Espresso does not need any server to communicate with, instead, it runs side by side with the app and delivers fast results. It gives fast feedback to the code changes so that developers can move to the next bug fix.
- Simple workflow
Espresso allows developers to build a test suite as a stand-alone APK that can be installed on the target mobile alongside the app under test and be executed quickly.
Disadvantages of using Espresso
- It requires access to the application source code
Without the source code, you won’t be able to do anything. Also, There is a risk to get used to the in-built test synchronization and UI – then it might be hard to work with WebDriver.
- Narrow focus
If UI tests are required for both Android and iOS, it will be necessary to write twice, for two different systems. If tests require to work with Android outside the application (for example, open a received notification with a text message), you’ll have to use additional tools, such as UIAutomator.
- Knowledge of launching Android app on emulators required
It is desirable to have at least minimal experience of building and launching Android applications on emulators.
Conclusion
Appium and Espresso both can be used to perform UI testing on Android app but if you have to choose one of them then you need to decide on the bases of your requirements. What kind of app is it and what kind of testing you want to perform. Developers who want to perform UI testing for their native Android app should go for Android Espresso. Although, if the test needs to support iOS and Android both and you want to test at a functional level then you can use Appium.
Related Articles:
Automated Testing Using Espresso
How to use Appium Inspector for Test Automation
How to Run Espresso Test on Remote Devices
Espresso with pCloudy.com
Run Espresso in pCloudy Using Gradle
October 25th, 2018 by Priyanka Charak
Importance of Test Automation
QA & testing become indomitable especially in the context of API testing. The development teams benefit from automated integration tests at API levels as it helps them in easy integration of apps and higher product adoption rate, ultimately helping the firm increase their profits. API layer is frequently ignored while developing and executing automated tests and mostly end to end user interface driven tests are executed to check if final application works perfectly after integration. API layer is not to be ignored and for a QA strategy to be successful, it should consider API testing as a fundamental part of the overall testing strategy.
Let us understand what API testing means:
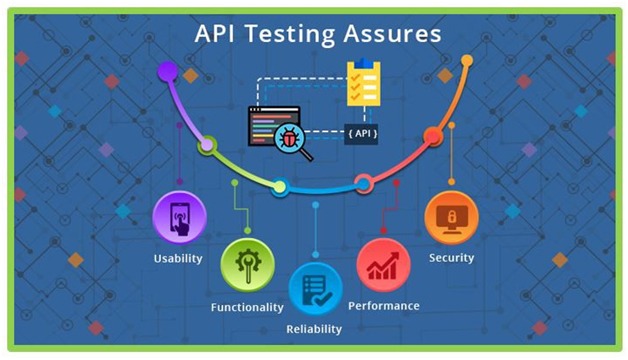
Application Programming Interfaces (APIs) are a set of programs that allow two or more software to communicate with each other and be able to exchange data smoothly. In the testing world, testing APIs is different than other types of testing. UI and functional testing is often given importance while API testing is ignored. The foremost responsibility of a tester is to ensure that API testing is performed in order to attain seamless functioning, performance, and the reliability of different data-driven applications and systems by verifying exchanges and communications between applications, systems, databases, and networks.
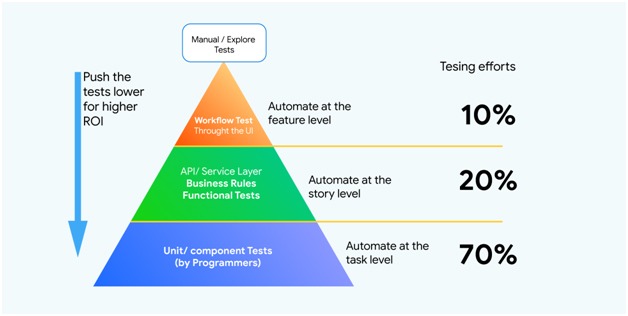
While integration testing has been a component of the test automation pyramid since its inception, it’s also been the most undermined layer in functional test automation. All tests that supercede the scope of an individual unit, and can’t be covered by unit testing are often executed through user interface-driven, end-to-end test scenarios. But while end-to-end tests can be seen as the ultimate integration test, where all components come together, having too many of them leads to test suites that take unnecessarily long to execute, and that are hard to maintain and keep stable. It’s often possible to test important parts of an application’s technical and business logic through an API. To understand the importance of API Testing more in depth, let’s understand the undermentioned benefits of Automated API testing:
1. Wider Scope than Unit testing
2. More Stability and Speed as compared to end-to-end tests
3. Introducing API Level Testing more seriously- A significant decision in Automation Testing
Wider Scope than Unit testing:
Unit tests are often run on small group of components within a single application layer. Issues are often not detected in distributed apps where one application layer ends and the next one begins. In order validate if the components are communicating as desired, API level tests are designed. So, the need of a strong API testing Strategy is of dire importance at the integration level especially when it comes to integrating with external components. Managing the testing environment is a critical task to perform especially when the components are with different teams.
More Stability and Speed as compared to end-to-end tests:
It is true that end-to-end tests are vaster in scope than API testing. They cover all the layers and components of the application but API tests cope up with its loss with its stability and speed. API tests are certainly faster than the former. End-to-end tests take longer time to load browsers and screens whereas API tests are based on individual request-response interactions (for example in JSON or XML format)which makes the execution faster with shorter feedback cycles. Moreover, user interfaces tend to change frequently due to various user change requests and adherence to advanced front end frameworks API tends to be more stable in terms of Interfaces that yields fewer faults and requires less maintenance.
Introducing API Level Testing more seriously- A significant decision in Automation Testing
API level integration testing should be a mandatory aspect of any automated testing agenda. It could be an unnerving move for those with no prior expertise in this area. It is mostly the tester’s cup of tea more than the developer’s as it can go beyond the component or application. The absence of user interface can be a blocker in accessing and testing the API. But you can opt from various automated API testing tools available in the market. Tools like RestAssured, SoapUI, and Postman are preferred among the most.
Conclusion
In the era of Artificial intelligence and IoT, the need for API tests is becoming intense. Automated API Testing strategy is the most effective strategy for faster delivery and reduced human inaccuracies. With the help of the tools, more API test requirements could be covered and API testing could be made more advantageous for secured and quality deployment of mobile applications in shorter time. Why don’t you integrate your automation framework using pCloudy’s API and make your app release faster?
Try pCloudy for free now.
September 7th, 2018 by Shivani Sinha
Appium 1.9.0
Having Appium 1.9.0 out, we find it to be a feature release, comprising multiple updates. Some of the key features brought forward in this release update are:
a. Appium users have been facing unlocking device issues with older versions of Appium. This had been a big headache but Appium has resolved this issue with update 1.9.0. Even if the device remains locked, Appium 1.9.0 is very much capable to unlock the device and run your script smoothly.
b. If the object is not identified anywhere in the script, you will be able to locate the error in Appium logs itself.
c. Appium 1.9.0 comes with much faster execution compared to its older versions.
d. The log information is more insightful and detailed than before.
Let us have a look at Feature release updates below:
(Source: https://github.com/appium/appium/releases)
General
- Full W3C Specification support.
- Add full beta of Espresso driver
for Android automation (used by specifying automationName capability to be
“Espresso”).
- Add driver for Samsung Tizen devices
- Add -image find element strategy,
- Fix –async-trace server argument, and rename as –long-stacktrace
- Sample code has been moved into the main repository to aid in maintenance.
- Fix status retrieval to speed up performance.
iOS
- Add support for Xcode 10 beta 5 and iOS 12 beta 5.
- Add preliminary support for MacOS Mojave beta.
- Add face id biometric support.
- Fix retrieval of device time, and add optional format parameter.
- Do not crash if there is no idevicesyslog when ending session.
- Handle frames when page changes in Safari.
- Add desired capabilities:
- remoteDebugProxy – port or Unix domain socket on which a proxy for the
remote debugger sits.
- safariGarbageCollect – turn on/off JS garbage collection in Safari.
- showSafariNetworkLog – print Safari network logs in the Appium server logs.
- mjpegServerPort – port to which screenshots can be streamed.
- Fix handling of settings updates, so simulators are not restarted unnecessarily.
- Allow pulling of folder from real devices.
- Add mobile: getContexts execute function, to retrieve meta-information (title,
url, etc.) about available contexts.
- Fix certificate retrieval and handling.
- Fix cookie handling, to allow secure cookies.
- Fix Safari timeout issues.
- Add support to retrieve Safari network logs, as safariNetwork log type.
Android
- Update Chromedriver to v2.41.
- Get Chrome version for Webviews in Android 7+, to find correct Chromedriver.
- Make sure UiAutomator processes are cleaned up during test.
- Fix handling of autoWebview capability.
- New desired capabilities:
- mjpegScreenshotUrl – url to stream screenshots to.
- chromedriverUseSystemExecutable – boolean flag to use the default Chromedriver
installed with Appium, avoiding any attempt to find correct Chromedriver.
- disableWindowAnimation – disable window animations on device (now available
on UiAutomator and UiAutomator2).
- pageLoadStrategy – page load strategy for Chromedriver.
- Allow test-only APKs to be installed.
- Fix implicit wait handling for finding elements.
- Better handle Unicode IME installation.
- Relax package validation logic.
- Fix error in UiAutomator searches with nested quotes.
- Perform accessibility refresh when needed on UiAutomator2.
- Improve logic for determining if apps need upgrade.
- Fix screen recording to allow longer recordings, up to 30 minutes.
Key challenge with Appium 1.9.0
Now, we bring to you the challenge area that we have been able to identify with this release.
- Even after using the capability automationName as uiautomatortool, we were unable to locate the object in >=Android v8.0 devices
If you have been able to find out any workaround for this issue mentioned above, kindly share it with us in the comments section.


