Do you know why Google has selected Gradle as the build system for Android Studio? Many Android developers work in a heterogeneous environment with different technology stacks. Gradle solves some of the hardest problems faced by the developers like how to automate the testing of apps and how to manage dependencies and variations that allow professional developers to develop variations of their app with one click. This is why pCloudy came up with a new update where you can now run Espresso with Gradle on pCloudy devices. Let’s get a brief introduction about Espresso and Gradle before we learn how to run Espresso with Gradle on pCloudy devices.
Espresso is a testing framework for Android which automatically synchronizes your test actions with the UI of your app. It also let the test wait until all the background activities have finished.
Gradle is an open source advanced build tool that allows seamless execution of tasks. It uses domain specific language and it is based on Groovy and Kotlin. It is a plugin based system so if you want to automate the task of building some package from sources then you can write the complete plugging in Java and share it with the world.
Gradle allows efficient and repeatable use of espresso and Test Orchestrator which allows automated yet fine-tuned control of the way you run your test. You can decide which specific test suites to be run to distribute the test cases across different devices. It is preferred by developers as it allows deep unit and functional testing rigs.
Power up your DevOps with Espresso and Gradle on pCloudy
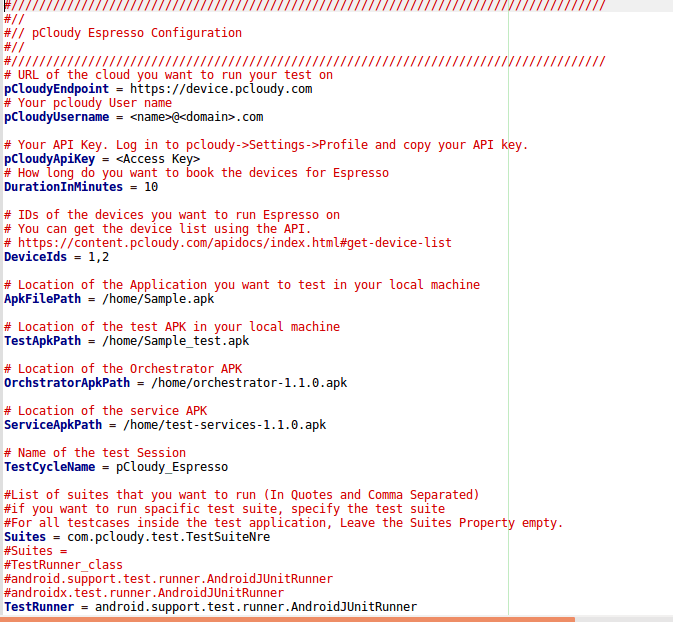
You would be running Espresso on your machine using Android Studio and Gradle. However, the test would be running on pCloudy device. There is a pCloudy Espresso script that is provided by us and you need to put that espresso script in the workspace of the project. Along with the Gradle script, you will also get a config file. The gradle script will read input parameters from this config file.
Then you run Gradle to invoke the script which will upload your Application APK, test APK and other APK files to pCloudy. It would acquire a device to run your test on, it would execute those tests it will report back the status of what is happening into the Android Studio. After the test cases are run you can see the detailed reports and after that gradle script will release the device for other users to use.
There is a one-time setup that you need to do to place the gradle script in the workspace and you need to fill in the configuration file. So when you run the gradle script it will complete all the task for you and generate the report.
Steps to run Espresso with Gradle on pcloudy
1. Download the espresso starter pack from here and Unzip it
2. You will find three files,
a. pCloudy_Espresso.jar
b. Config.properties
c. build.gradle.SAMPLE
(This is a sample build.gradle that shows how to change your build.gradle to add the pCloudy Espresso jar.)
3. Copy the contents of the file build.gradle.Sample to the build.gradle file of your Android Application to register the new Gradle task and update

4. Place the config.properties file in your android workspace in the same directory as your build.gradle file.

5. Update the config.properties file as guided in the comments in the file.
6. In your Android workspace run the command by typing the name of the gradle task as below.
![]()
7. Once the test execution is complete you will get a URL of the test execution report. Some fields in the report are empty right now. We will fix them in subsequent phases.

The use of gradle has made it easier to run Espresso test on pCloudy devices. We can just use the configuration file and easily run the test scripts on pCloudy devices. This will save time and effort as it further simplifies the app testing process in pCloudy.
You can watch our webinar for more information.
Related Articles:

 February 07, 2025
 January 24, 2025